Lab 5 - Event Management and Runbook Automation with IBM Cloud Pak for Multicloud Management
- Lab Overview
- Prerequisite
- Business Context
- Create Online Banking support group
- Configure Slack integration
- Define Incident Policy
- Configure Ansible Tower
- Configure Ansible playbooks
- Configure Runbook automation
- Test runbook automation
Lab Overview
IBM Cloud Pak for Multicloud Management is the enterprise-grade multicloud management solution. This cloud-agnostic solution leverages open-source technology and your existing tools to provide an integrated dashboard to manage your environments and your applications where they need to reside - public, private, or edge - with choice of vendor cloud platform and consistent visibility, governance and automation.
Event Management installed along with Monitoring module of the Cloud Pak gives you the capability to automate management of incidents and events that are associated with resources and applications. You can visualize and manage multiple clusters, and consolidate the information from your monitoring systems to address problems. Events can indicate something that happened on an application, service, or another monitored object. All events that are related to a single application, or to a particular cluster, are correlated with an incident. Event Management can receive events from various monitoring sources, either on-premises or in the cloud.
In this lab, you are the leader of the Operations team, responsible for problem resolution. You define how your team is notified in the event of a failure and define a “runbook” guide of possible remediation steps.
In this tutorial, you will explore the following key capabilities:
Define a new support group and assign specific incidents to this groupCreate incident policy that automatically send notifications to Slack channelConfigure Ansible Tower and define new Runbook automationCreate event policy that automatically runs Ansible playbook in response to the eventGenerate sample events to verify that your new policies work as expected
Prerequisite
- You need to provision your own copy of the CP4MCM 2.1 environment, start it and verify for correct startup (check here).
Business Context
In a real-world environment, an operator isn’t going to continually watch the overview screen, waiting for new events or failures. This is where the event management capability comes in, which not only notifies operators when failure conditions occur but can also provide automated and guided remediation of error events.
In this tutorial, you will log in to the Hub cluster to configure and use event management capabilities.
You will complete the following tasks:
- Create Online Banking support group
- Configure Slack integration
- Define Event Policy
- Define Incident Policy
- Configure Ansible Tower
- Configure Runbook automation
- Test runbook automation
Create Online Banking support group
In this exercise, your task is to configure event management for handling events related to the Online Banking application.
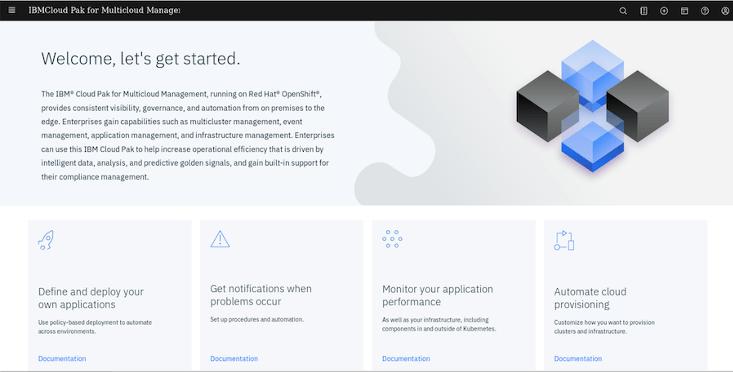
To start the lab, you should be in your Cloud Pak for Multicloud Management Web Console. If you are not, check here how to open your console page.
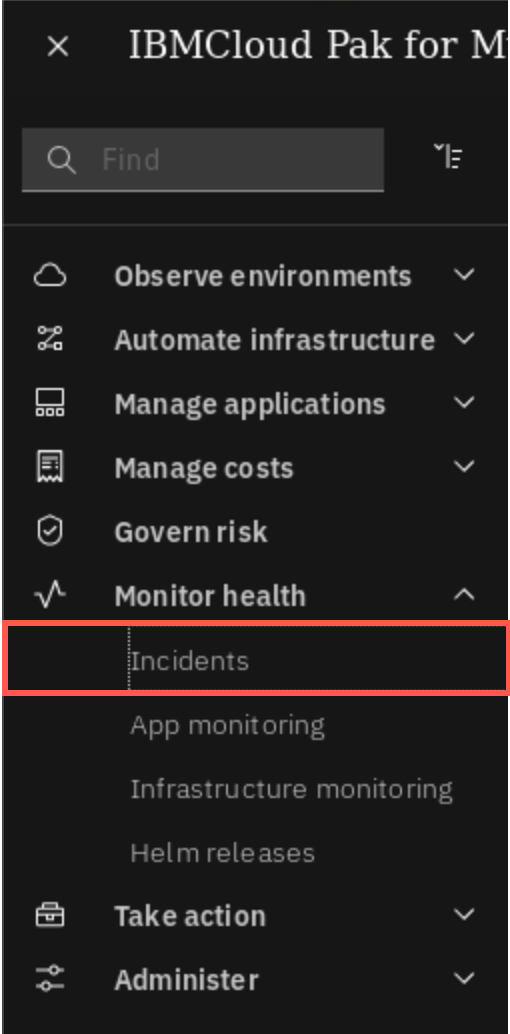
Now, let’s open the Monitoring module user inteface. Click the hamburger Menu and select Monitor health -> Incidents.
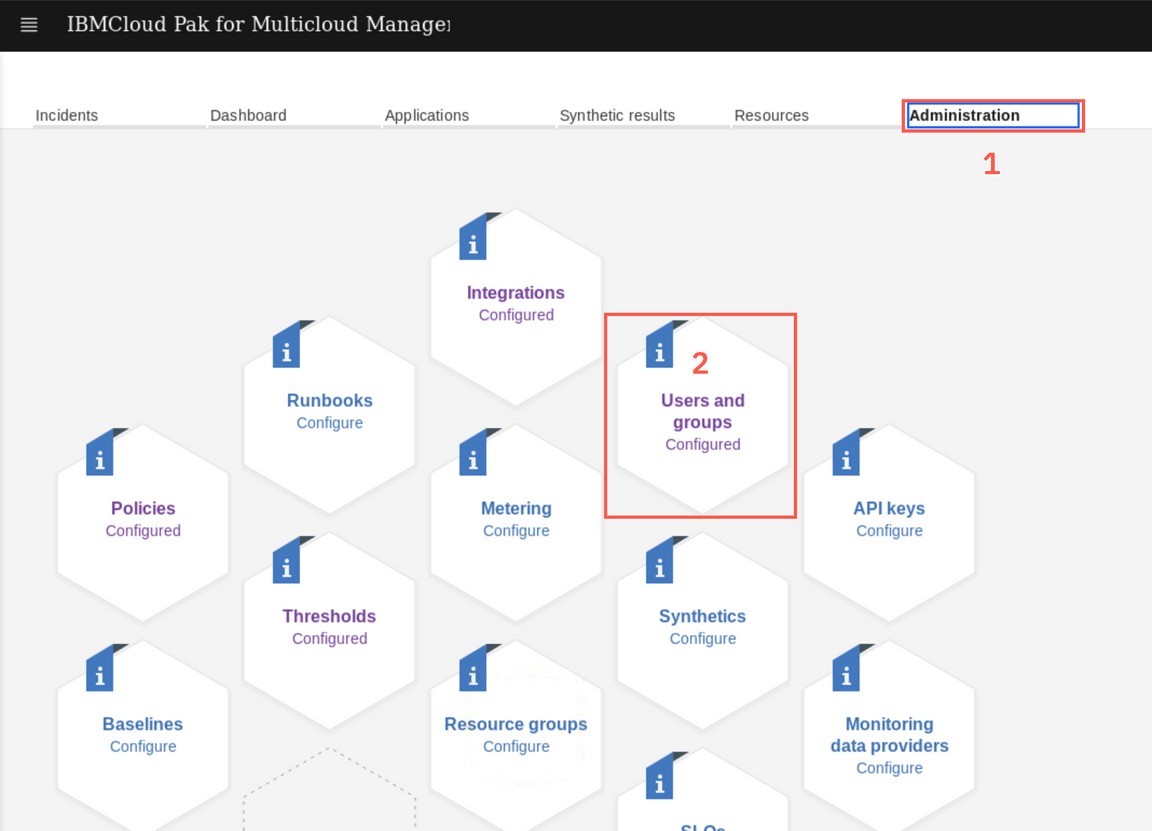
To effectively handle incidents at scale, they must be automatically dispatched to the right users for handling. The first step is to create a group for users who will be responsible for handling Online Banking related events and incidents.Click the Administration tab (1) and then Users and groups (2)
Notice that some users have already been defined. There are the users with ClusterAdministrator role that were automatically assigend Operations lead role in the Monitoring module. Before we create support group, let’s start with adding a user to the system. The demo environment has an LDAP configured, so you will import user from the LDAP.
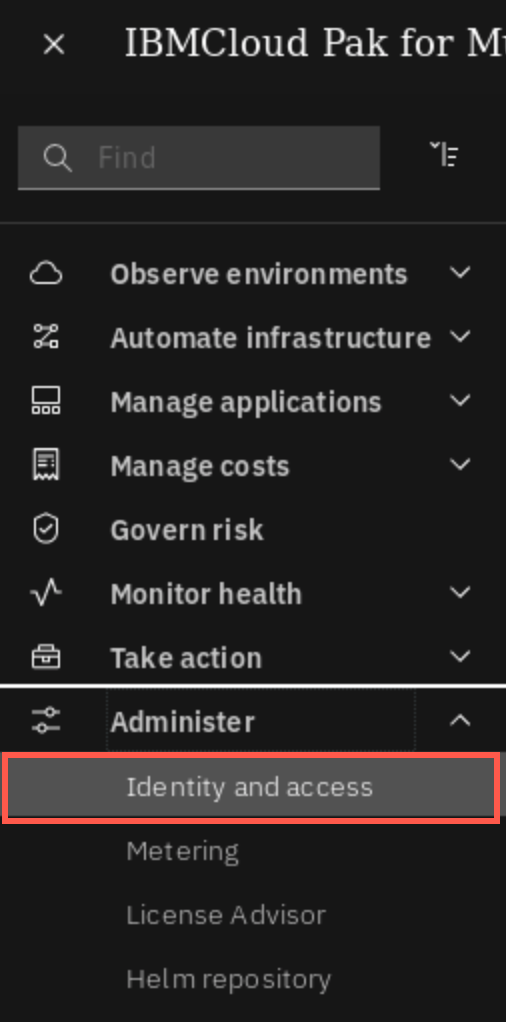
Open the humburger Menu and select Administer -> Identity and Access
Select Teams tab and then click on the operations team
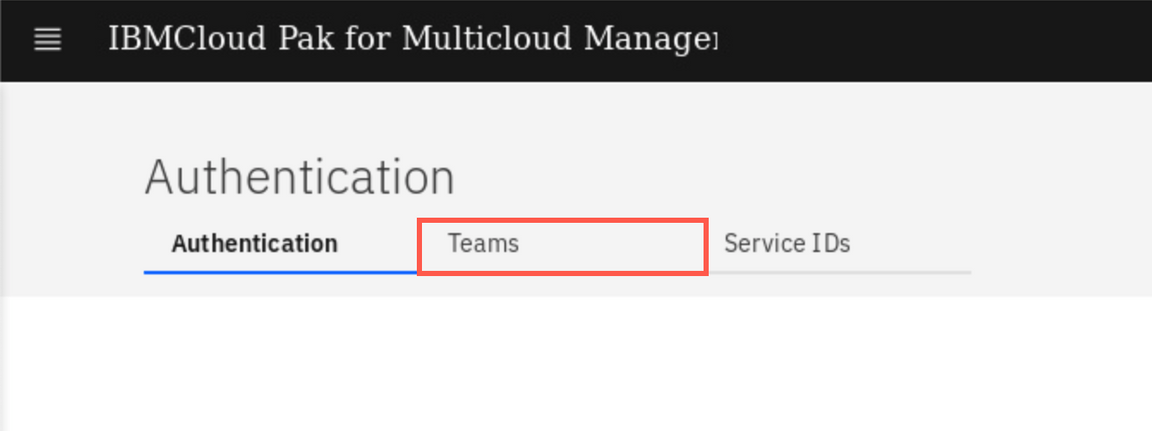
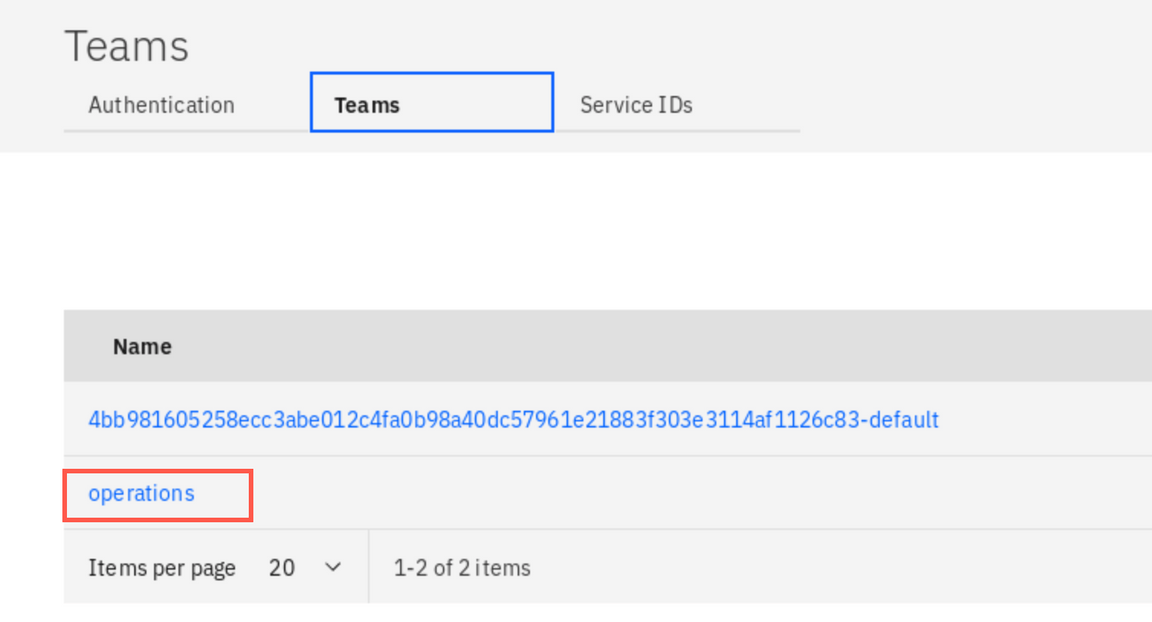
Select the Users tab (1) , and then click Add users (2)

In the Select domain dropdown pick my_ldap. This dropdown shows all identity sources registered in the Cloud Pak. In this environment, there are two sources available: a default Openshift authentication (Cloud Identity Directory) and LDAP connection my_ldap.
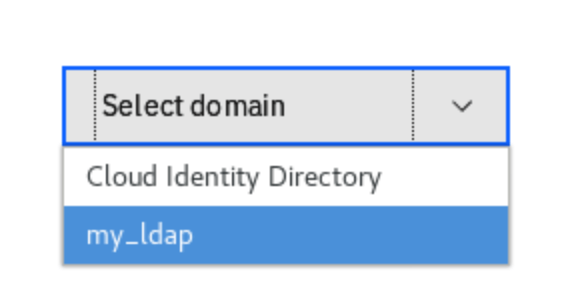
In the search box, enter carlos and hit Enter (1). Then, select the user carlos (2), change the role to Editor (3), and finally click Add button (4).

Now, go back to the Monitoring UI (Menu-> Monitor health-> Incidents-> Administration -> Users and Groups). You should see user
carlosin the list with the roleOperations engineer. This is default mapping of Cloud Pak roleEditorto the Monitoring module roles. Click Groups tab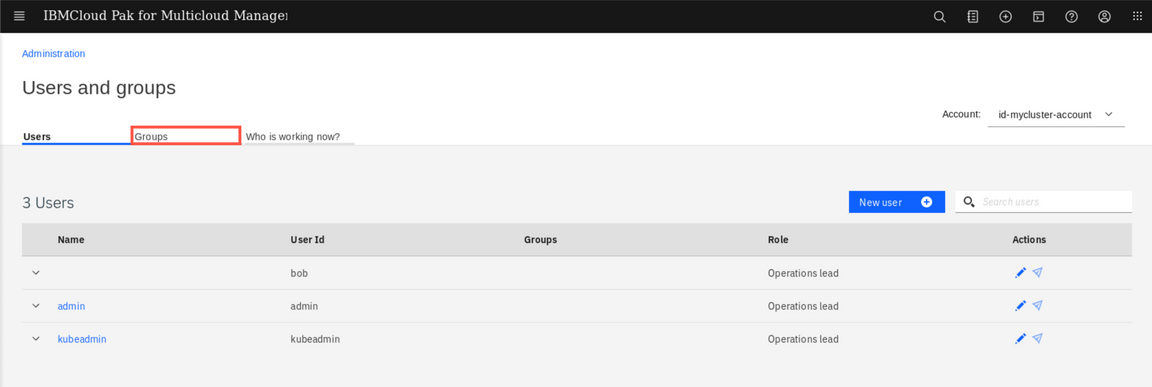
There are no groups defines so you need to create one. Click New group.
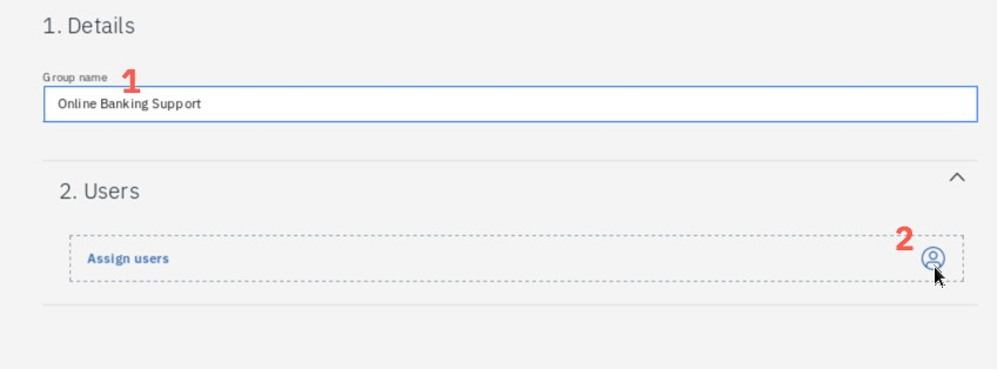
Provide the name Online Banking Support (1), then click Users icon (2), select user carlos (3) and click Assign
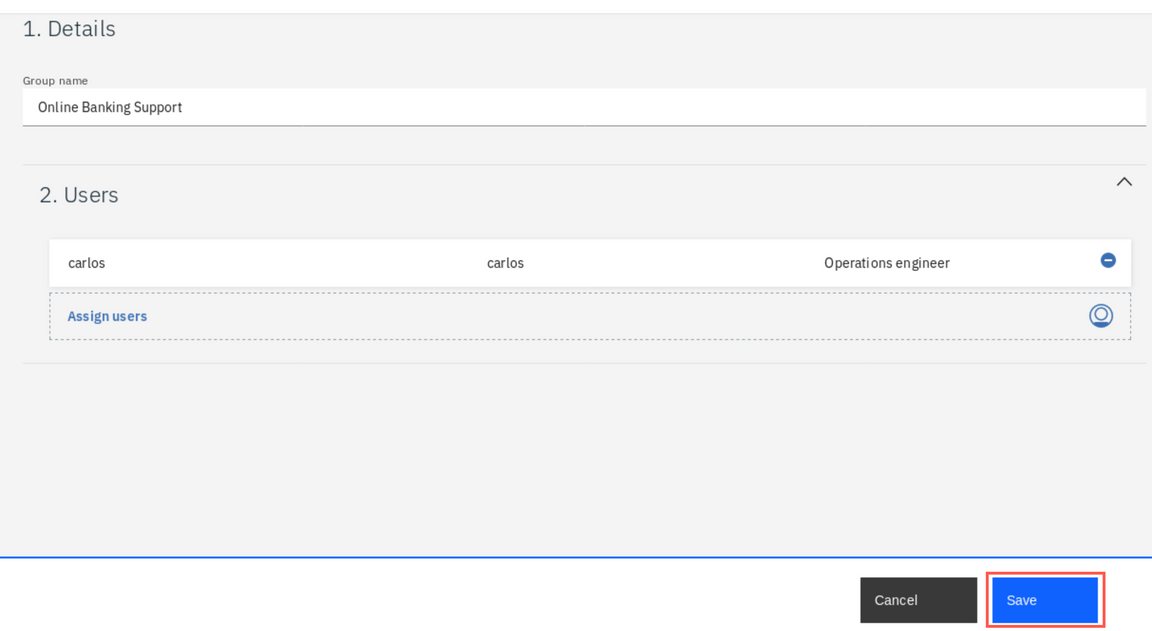
Finally, click Save
Now, when you have the right support group defined, let’s configure which incidents should be assigned to this group and how the users should be notified.
Review Slack integration
Operation teams use different notification methods. Some prefer emails, but many uses collaboration tools like PagerDuty, Slack or Microsoft Teams. In this exercise you will configure integration with Slack.
Go back to the Administration view.
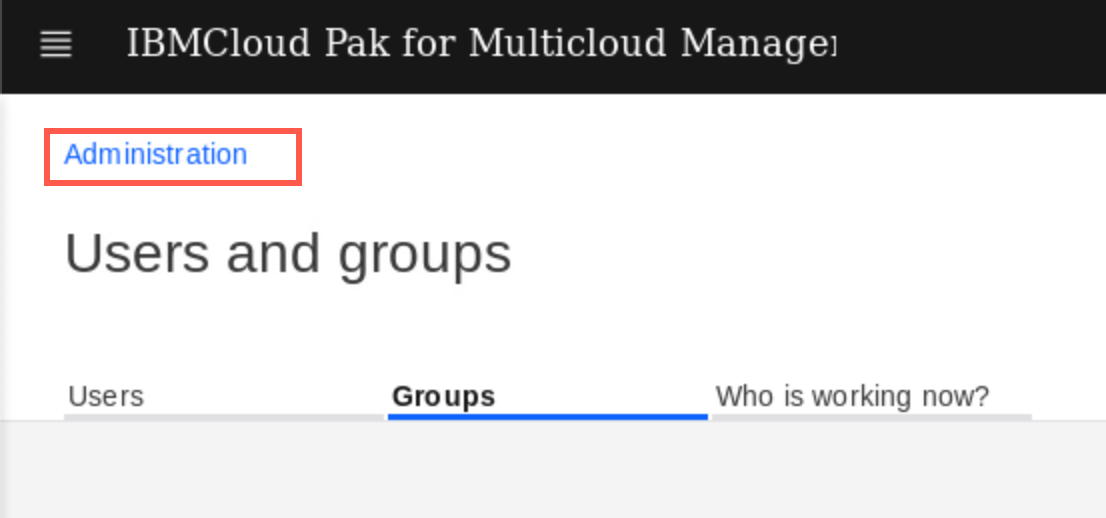
Select Integrations tile
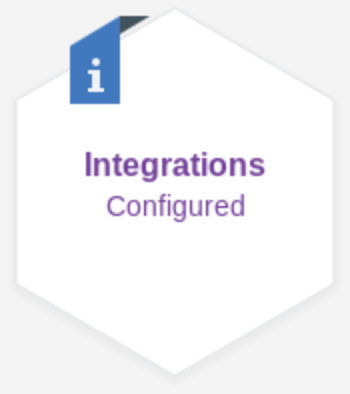
This view shows the incoming integrations, which define the source of the events coming to the system. There may be some integrations already defined (depending on what labs you have done before), for example, Prometheus service from a managed-cluster or local IBM Cloud Application Performance Management agents (like Kubernetes data collector). To see what other sources are available out-of-thebox, click New integration. Review integrations available out-of-the-box, and when done click Cancel.
On the Integrations view, select Outgoing tab (1) and then click New integration (2)

You can see multiple default integartions provided by Cloud Pak for Multicloud Management for sending information to the other systems. If your company is not using any of the pre-defined ones, you can use the Generic webhook.
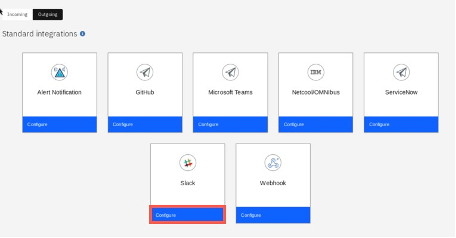
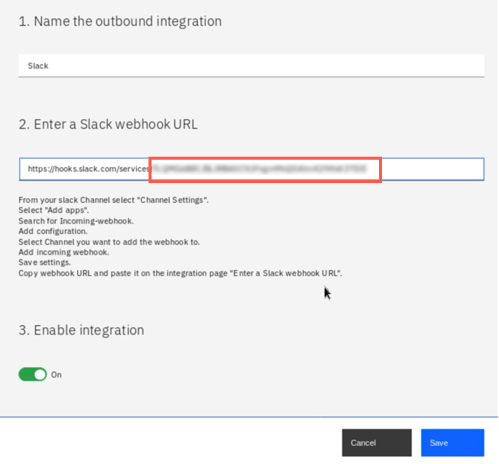
In this exercise you will use Slack, which was already configured for you - to review configuration, click three dots in the corner of Slack tile and select Edit. You can notice that to configure the integration you only need a webhook generated from the Slack platfrom for your target channel. The instructions how to do this are provided on the screen. Change the webhook URL (last 3 elements) for the following value
TLQMG6B8C/B017XG4BT2T/1q9S4m9fXrcnrUWj1XIlI75uand click Save.
Now, go back to the Incoming integrations tab. You can see that along with the configured integrations, there is an additional tile for generating Sample events.
Sample events are artificial events that are injected into the system to demonstrate some capabilities but are also very helpful for testing policies and runbook automation. Click Generate. If you wait for about a minute you should see the following notification.
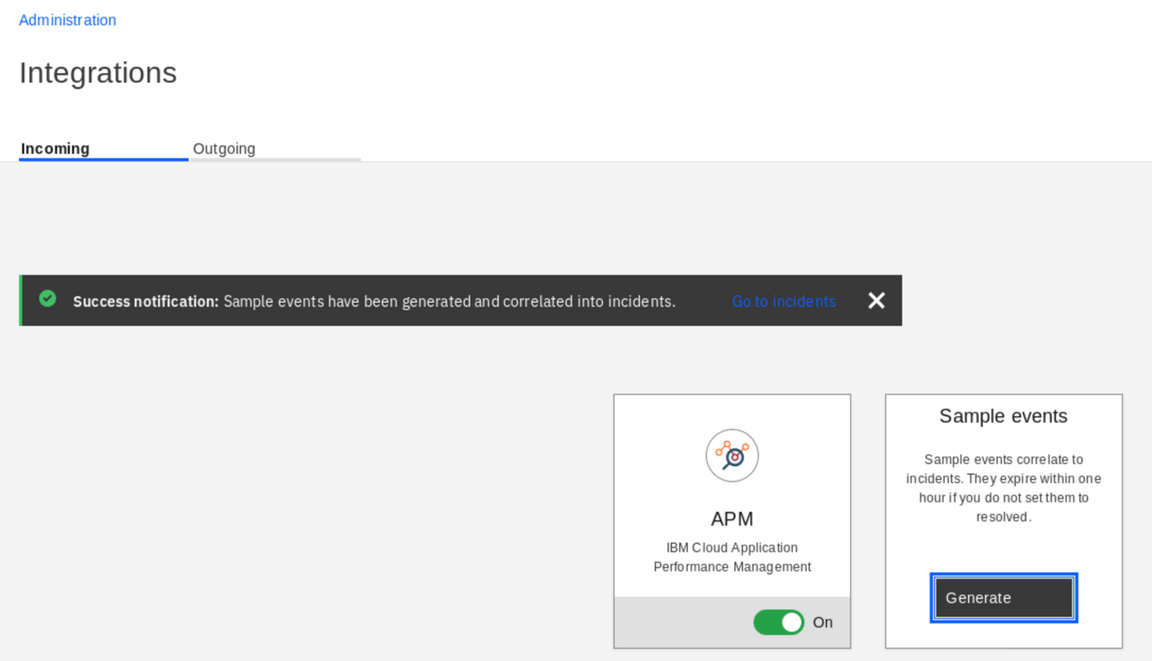
If you cannot see the notification or see an error, follow the tutorial as the events were probably generated anyway.
Go back to the Administration tab clicking the link in the upper-left corner.
Define Incident Policy
In this step, you create a policy that automatically assigns incidents related to the Online Banking application to the newly created support group.
You should view the Administration tab. Click the Policies tile.
There are two types of policies:
- Event policies define how to handle events received by the system. Events are generated by data collectors, monitoring agents, or can come from numerous external sources defined in the Integrations section. Based on the attributes, some events are correlated into Incidents.
- Incident policies define how to prioritize the incidents, to whom they should be assigned for handling and how the owners should be notified
Click Incident policies tab.
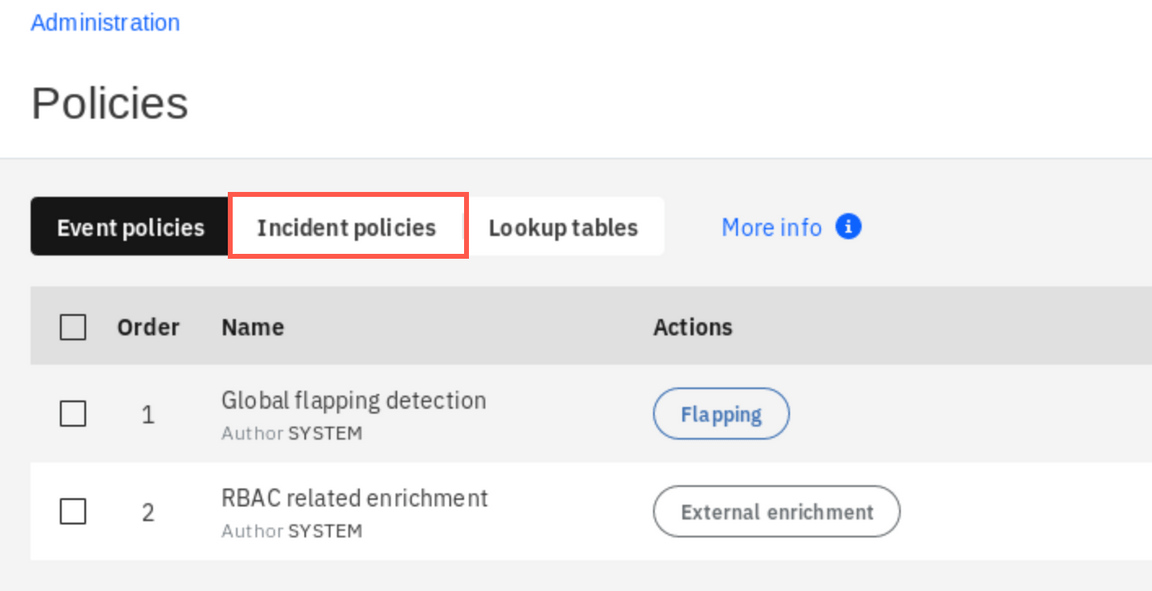
There are several default policies already defined in the system. However, to handle Online Banking related incidents you need to create a new one. Click New incident policy.
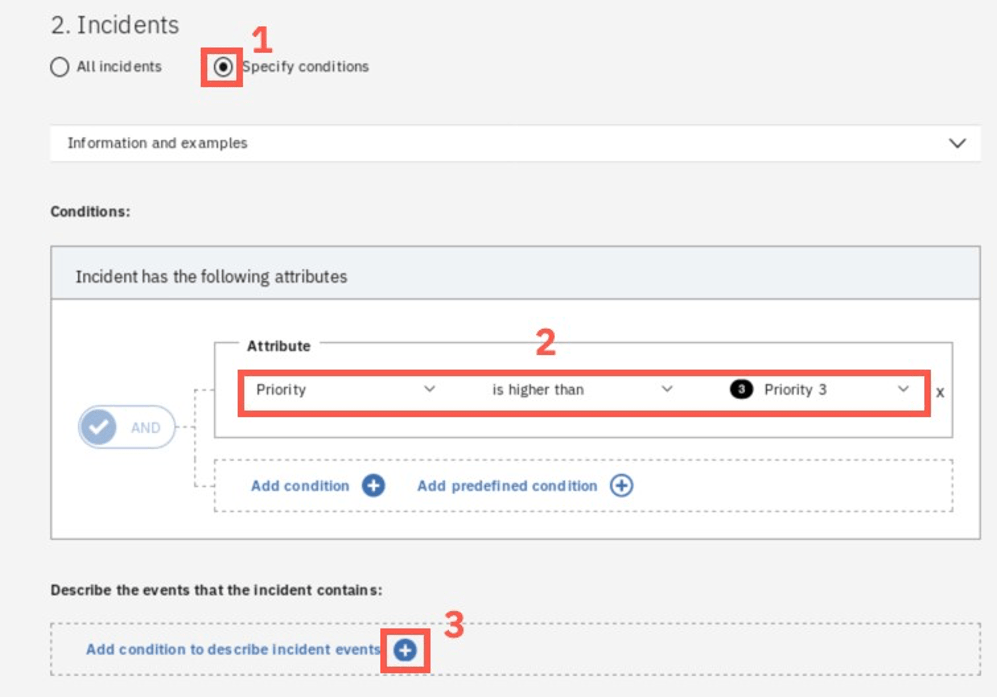
Enter the policy name and description. In the Incidents section below, select Specify conditions radio button. Then, in the conditions section, select Priority is higher than Priority 3 to filter out less important incidents. Finally, click the Add condition to describe incident events to specify that you are interested in incidents related to Online Banking.
In the section that opens, specify the condition that the events correlated into the incidents must match to activate the policy. For Condition 1 select Application contains Online Banking. To verify if the policy matches any events in the system, you can click Test.
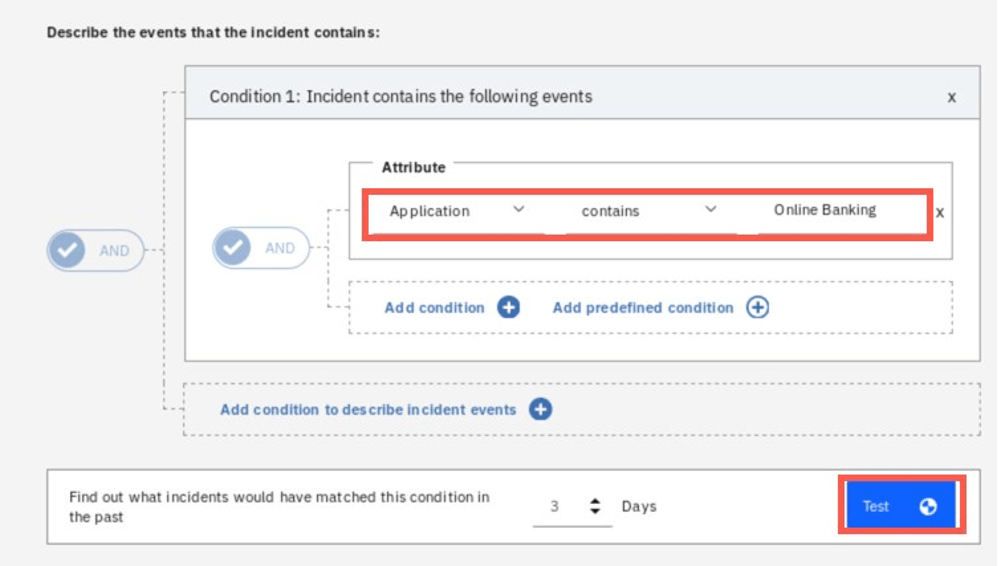
If you successfully generated sample events before, you should see at least one incident matching the defined conditions.

Scroll down to the Action section. Here select the Assign and notify, and then click Add assignment/notification.
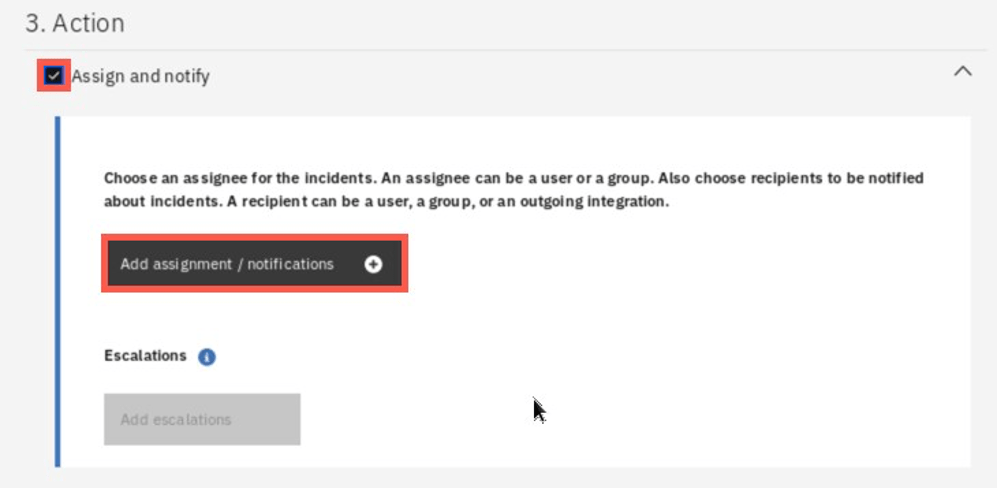
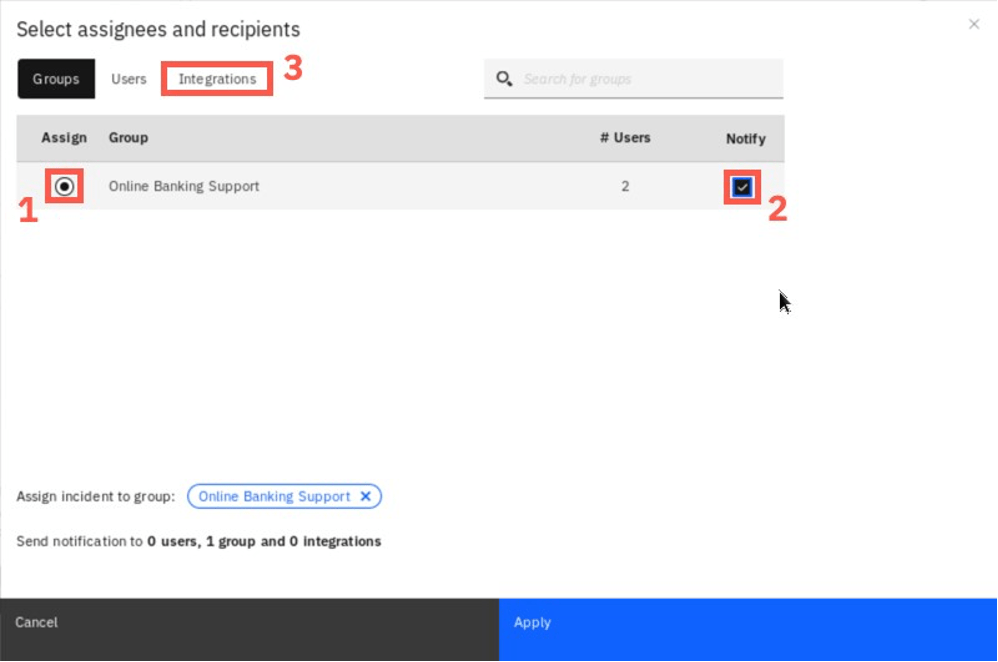
In the dialog that opens, select Online Banking Support group and check the Notify checkbox. Then click the Integrations tab to define the notification details.
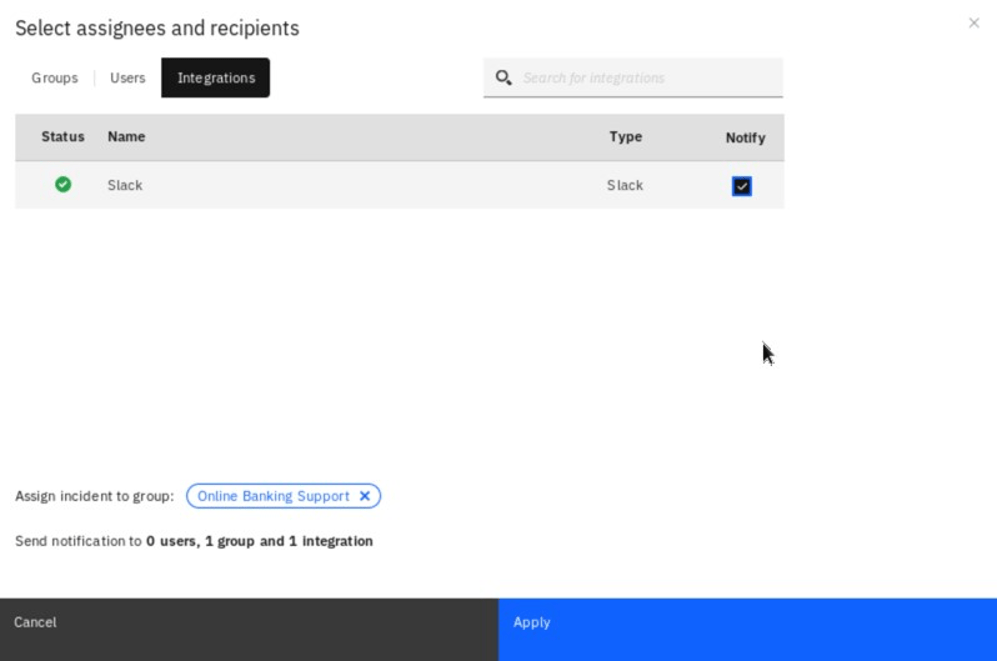
Select the Notify checkbox in the Slack row and click Apply at the bottom.
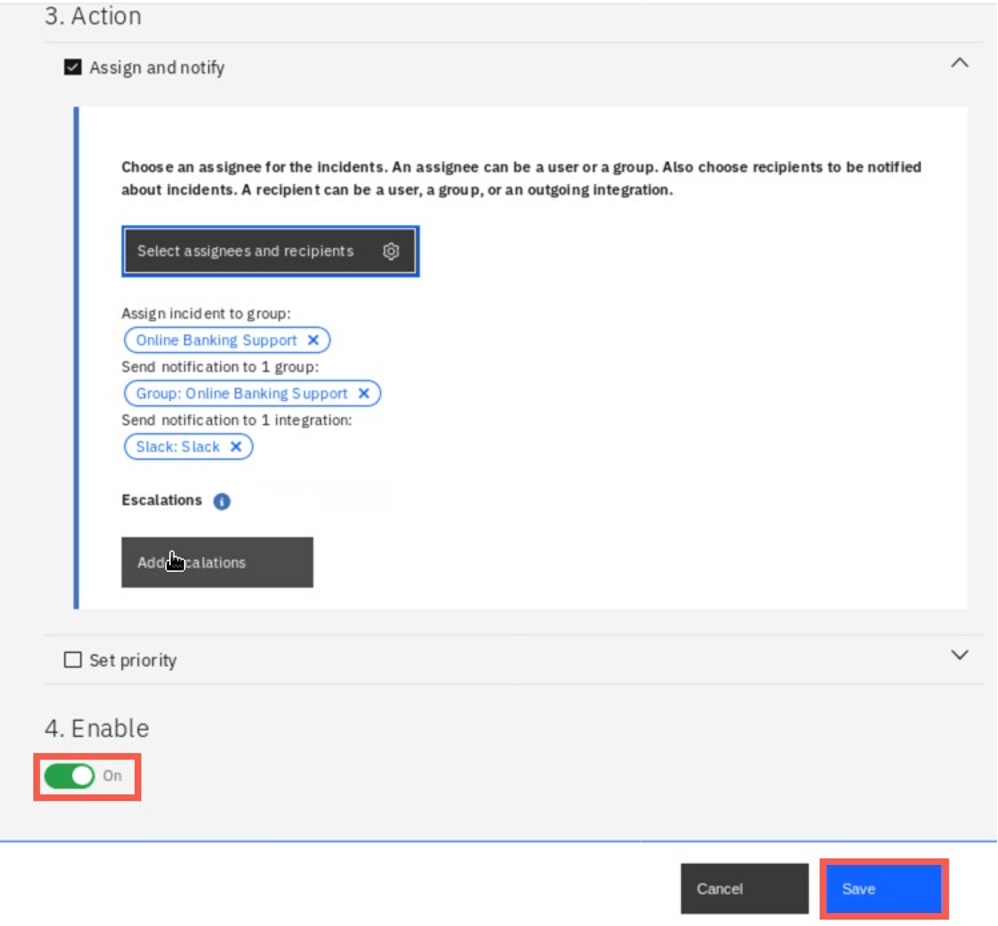
Finally, Enable the policy and click Save.
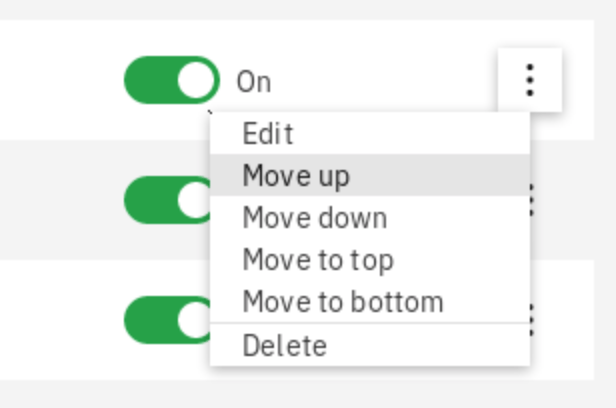
You have just defined a new incident policy. The policies are processed in a order visible on the screen. If you would like to change the order you can select a policy and use a context menu (vertical three dots on the right) and select Move up or Move down. This is sometimes important - for example if one of the previous policies will change the priority of your incidents, your policy may never be activated. However in this lab there is no need to change the sequence.
Go back to the main Administration view clicking the link in the upper-left corner.
Configure Ansible Tower
In this section you will configure Ansible Tower. With Red Hat® Ansible® Tower you can centralize and control your IT infrastructure with a visual dashboard, role-based access control, job scheduling, integrated notifications and graphical inventory management. Ansible Tower is embeded into Cloud Pak for Multicloud Management to drive automation of event response with runbooks and is also used for configuration and compliance automation within infrastructure module.
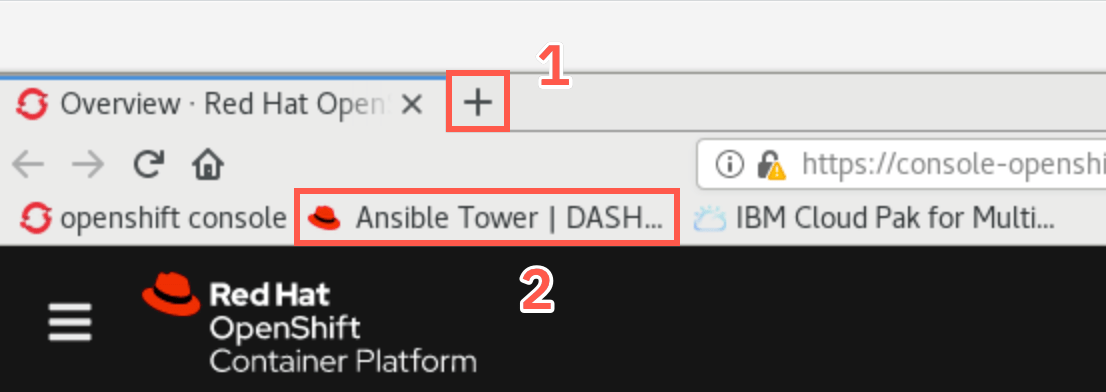
Open a new browser tab and use the Ansible bookmark to open Ansible Tower interface.
Provide
adminas username and paste the password using Skytap stored credentials. IF THAT DOES NOT WORK (TEMPORARY ISSUE) USEhemXyAF1frDlbOIxxes2h1ubbTSFtMO4AS PASSWORD.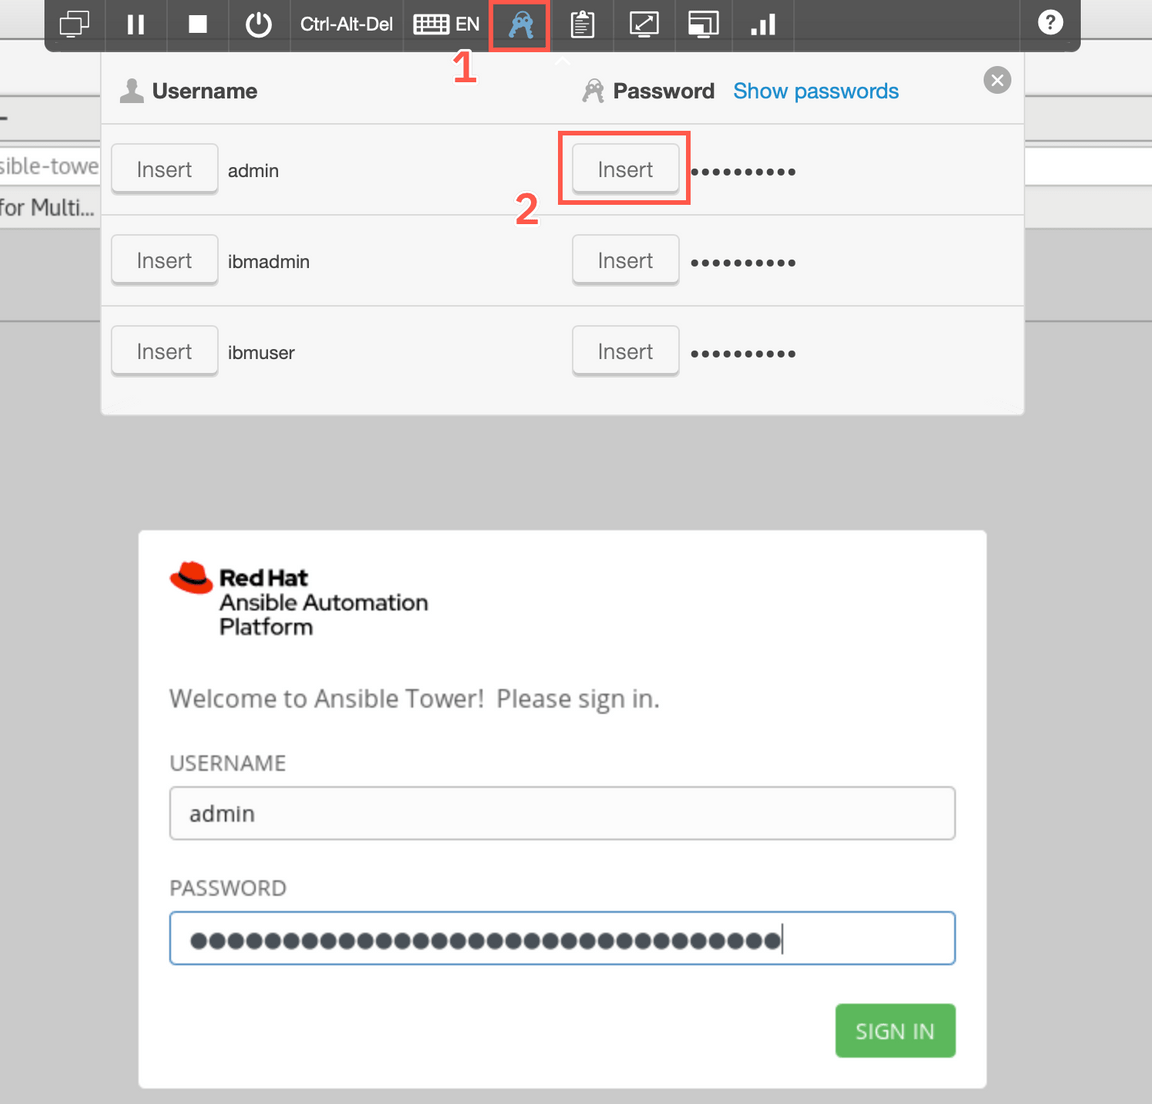
First, you need to define a credentails to be used with the target environments. Select Credentials from the menu and then click ’+’ sign to add new credentials.

You will add 2 different type of credentials. First let’s add a credentials to the vcenter that allows Ansible Tower to collect data from the Vmware vSphere environment. Later, you will add credentials to specific virtual machines, to allow running Ansible playbooks on these VMs using ssh.
Provide a name (e.g.
vcenter) (1), select the OrganizationDefault(2), then select the Credential type lookup (3) to pick the Vmware vCenter option (5) available on the last tab of the list (4). Then click Select.Then, provide
10.0.0.100as Vcenter Host,administrator@vsphere.localas Username andP@ssw0rdas Password. Finally, click Save.
To add the second credentials, click the ’+’ sign again, and provide name (e.g.
ubuntu). This time select typeMachineand provideibmuseras Username andpassw0rdas Password. You can notice it is also possible to provide the SSH key as a credentials, but you won’t use this method in this tutorial. Scroll down and click Save.
Finally, create a third set of credentials, named
desktop, with useribmuserand passwordengageibm.Now, let’s add new Inventory. In the menu select Inventories.
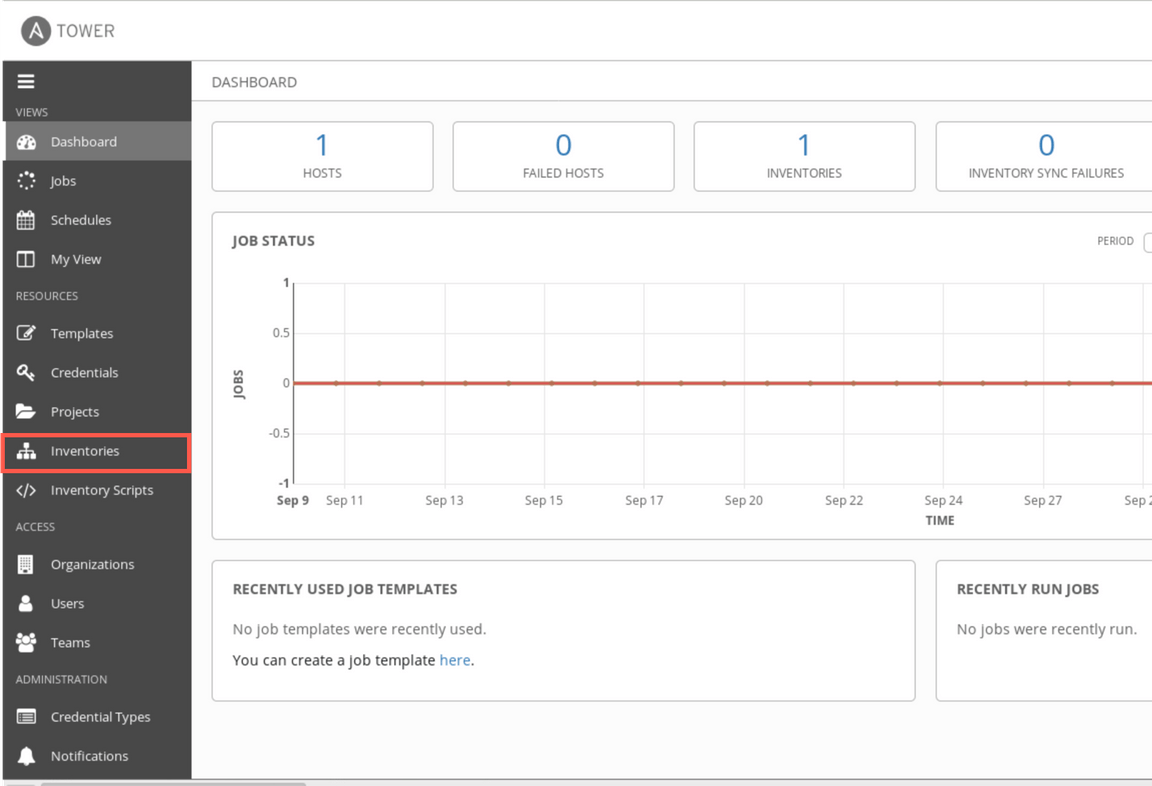
An Inventory is a collection of hosts against which jobs may be launched. To create automation you must first define a set of target hosts as Inventory and assign the credentials that Ansible will use to connect to the target system. You can define a static inventory for a well known hosts in your infrastructure, as well as dynamic inventory that will be automatically populated with the virtual machines provisioned in a public or private cloud. Let’s start with dynamic one. Click ’+’ sign on the right and select Inventory to create a new inventory.

Provide the name
vmwareand click Save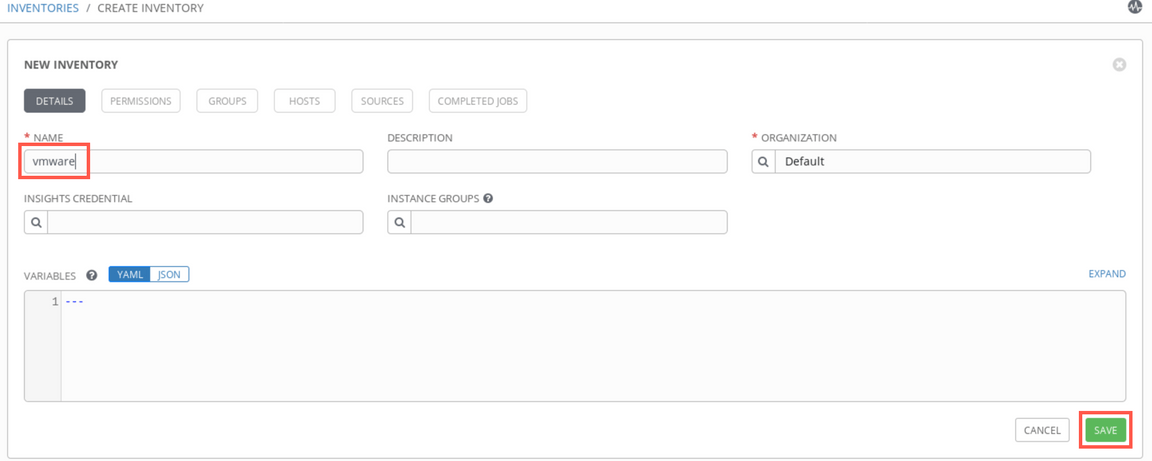
Now, select Sources tab (1) and click ’+’ sign (2) to add new source.

Provide a name (e.g.
vcenter) and select SourceVMware vCenter.
Credentials
vcentershould be populated automatically, as there is only one entry of this type defined. If you have defined more, select the credenitals defined in step 4 above. Then, click Save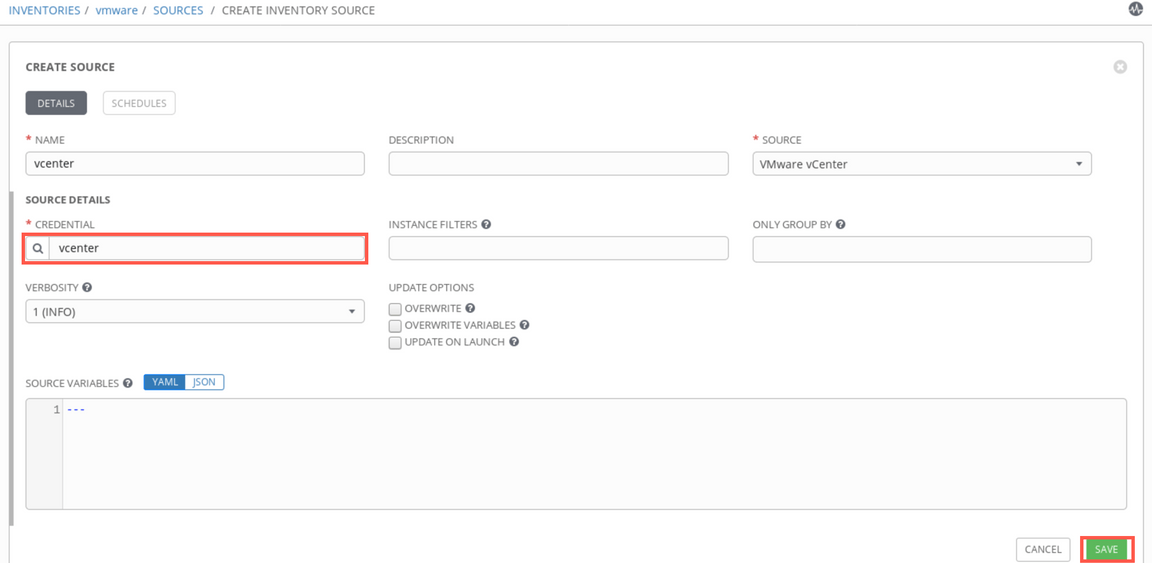
On the Sources view, select the Sync icon (1) to pull inventory details from Vmware environment. When the sync job completes, you should see a green cloud icon next to the source name (2).

Now, add the static inventory for other hosts. Add new inventory but this time provide the name
static, click Save button and then instead of sources tab, selecthosts. Then click green ’+’ sign on the right to add a new entry. Provide10.0.0.10as Host name and click Save.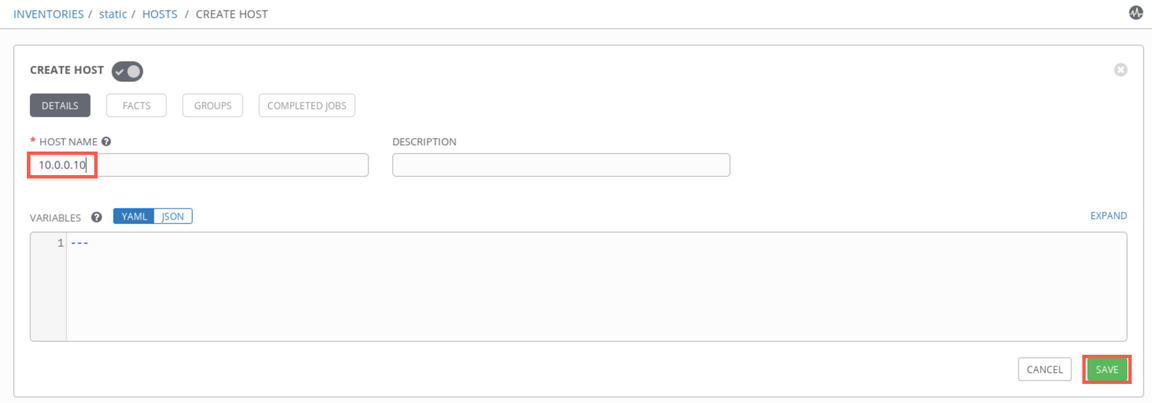
This host is the desktop, in the next excerices you will run Ansible jobs on that host as a part of automation. However, before you can do this, there is one more step required: you need to add playbooks to your Ansible Tower.
Configure Ansible playbooks
Ansible is a very popular open-source automation tool, with a large number of available automation scripts called playbooks. Ansible basics are outside scope of this tutorials so you will just use the pre-defined sample playbook. To learn more about Ansible visit Ansible website
Sample playbook that you will use as the automation action triggered in response to the event is meant to create a sample file at the target host. It emulates the real action which normally one would take - for example to restart failing application.
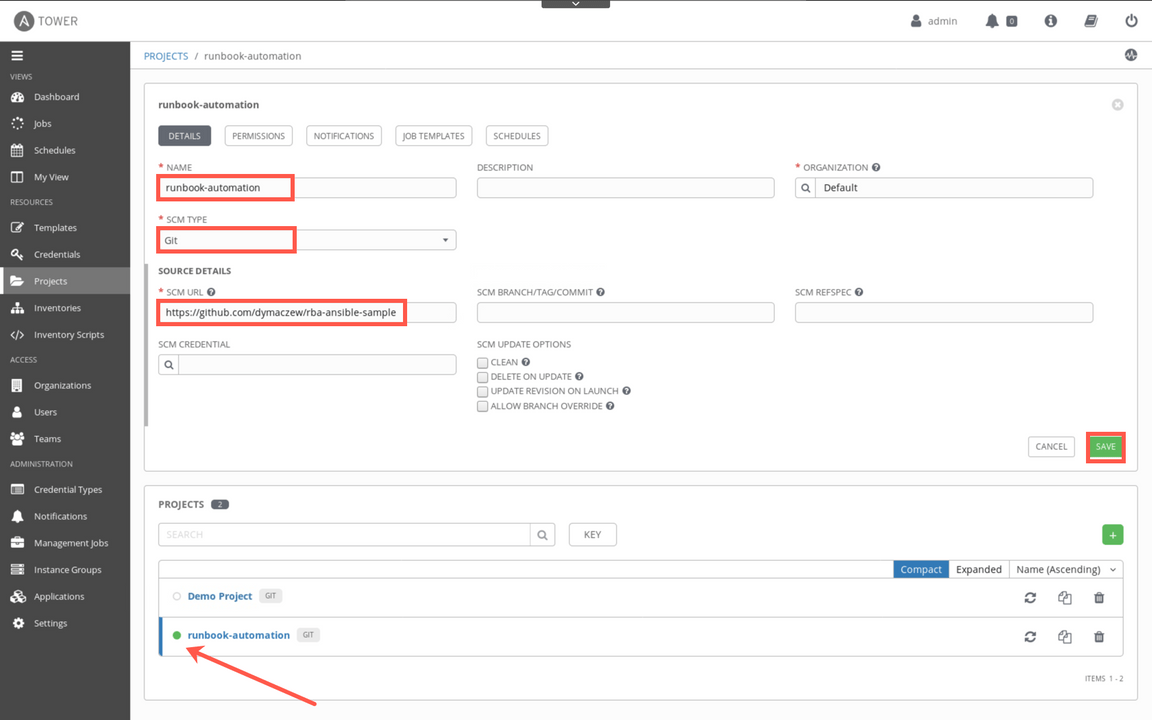
In order to add a new playbook with automation scripts you have to first create a project. From the left-side menu select Projects (1) and click ’+’ sign to add a new project (2).

Provide the name of the project (e.g. runbook-automation), select Git as SCM Type and enter https://github.com/dymaczew/rba-ansible-sample as SCM URL. When done click Save. This action starts in the background process of retriving content of the repository. If the syncronization is successful, you should see a green dot next to the project name as pointed by the arrow on the screenshot below
Now, you need to create the job template within a project. Select the Job templates (1) tab and click ’+’ sign (2) to add new Job template.

Provide the following details on a Job template creation form:
- Name: Start_Online_Banking
- Inventory: static
- Credentials: desktop
- Verbosity: 0 (Normal)
- Project: runbook-automation
- Playbook: start-online-banking.yaml
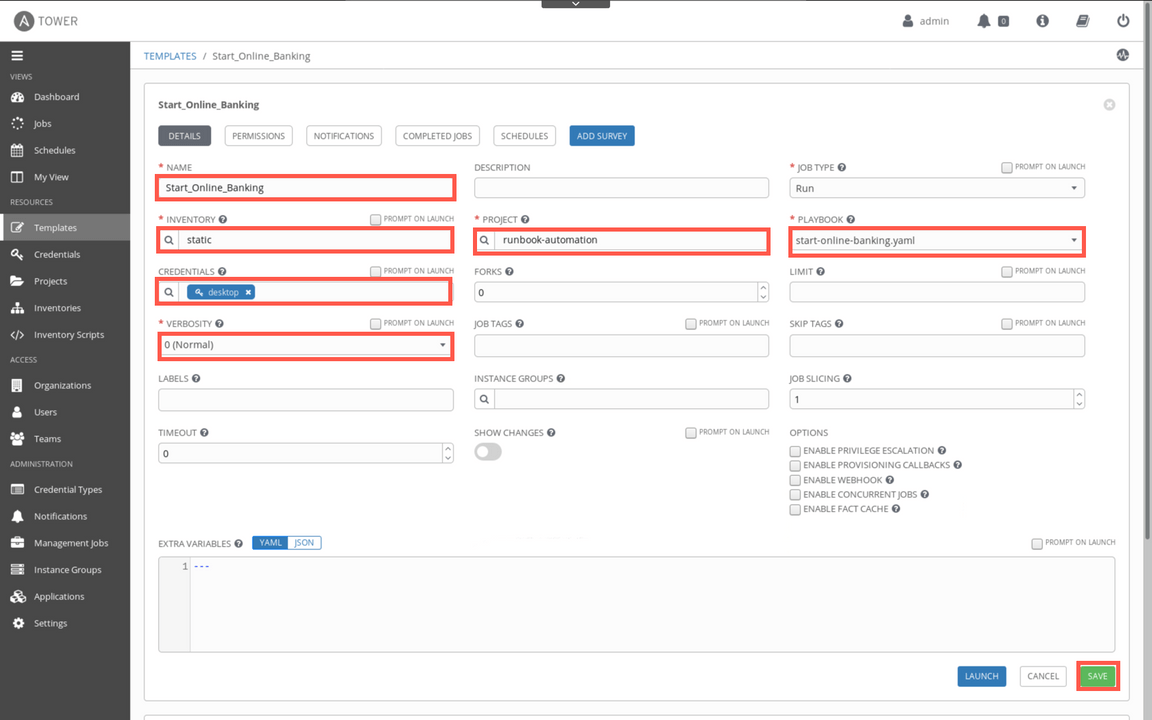
As you can see, there is a lot more different options available to customize the job execution, but you will not explore them in this tutorial. When ready with the inputs, click Save.
This completes the Ansible preparation part. You have defined the automation task, created inventory file and provided credentials. Now, let’s define the trigger which executes this action when the specific event occurs.
Configure Runbook automation
Runbooks are automated, semi-automated, or manual procedures capturing the organizational knowledge of how to diagnose and resolve different types of incidents. IBM Cloud Pak for Multicloud Management allows you to define and use runbooks, leverage automation through scripts but also integrate with multiple automation tools, like Ansible Tower or BigFix. In this section, you explore these capabilities.
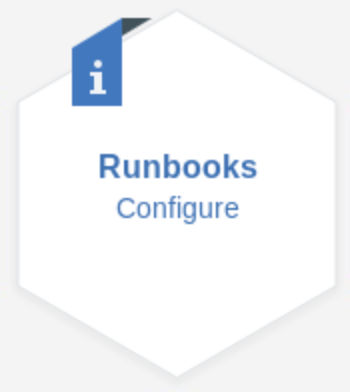
You should be in the Administration view. Click Runbooks tile
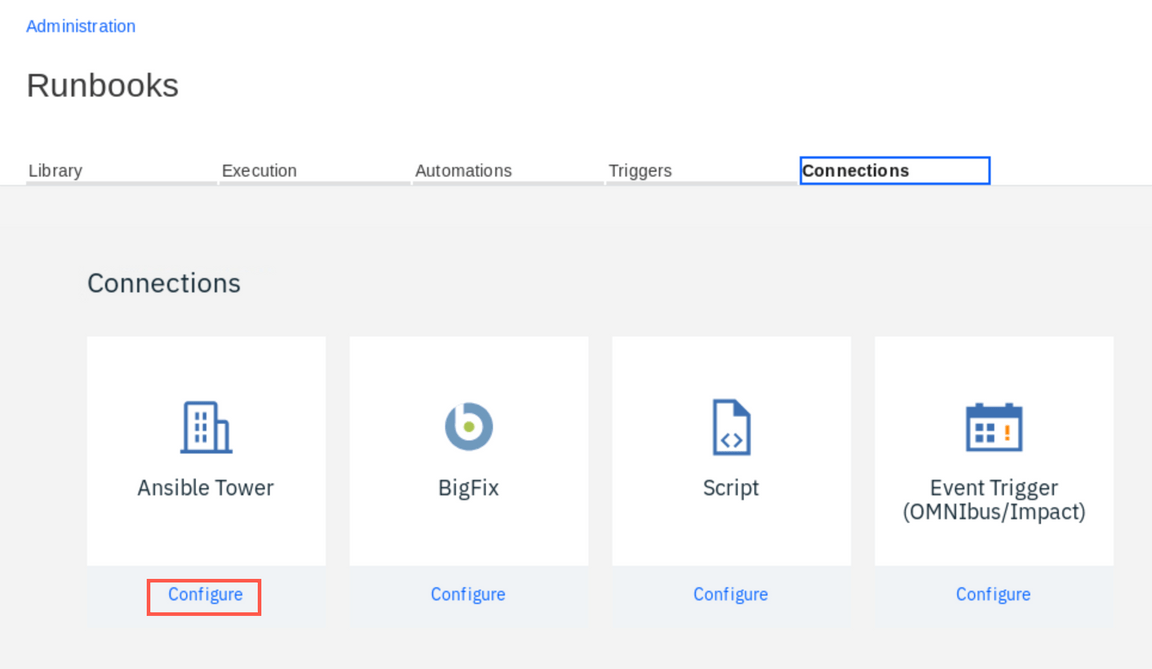
Click Connections tab. Connections let you define automation tools that you want to use in your runbooks. Here you will define a connection to Ansible Tower

Click Configure under the Ansible Tower tile.
Enter Asible Tower URL:
https://ansible-tower-web-svc-ansible-tower.apps.demo.ibmdte.net, provideadminas user and insert the password using the stored credentials from the Skytap menu. Finally click Save.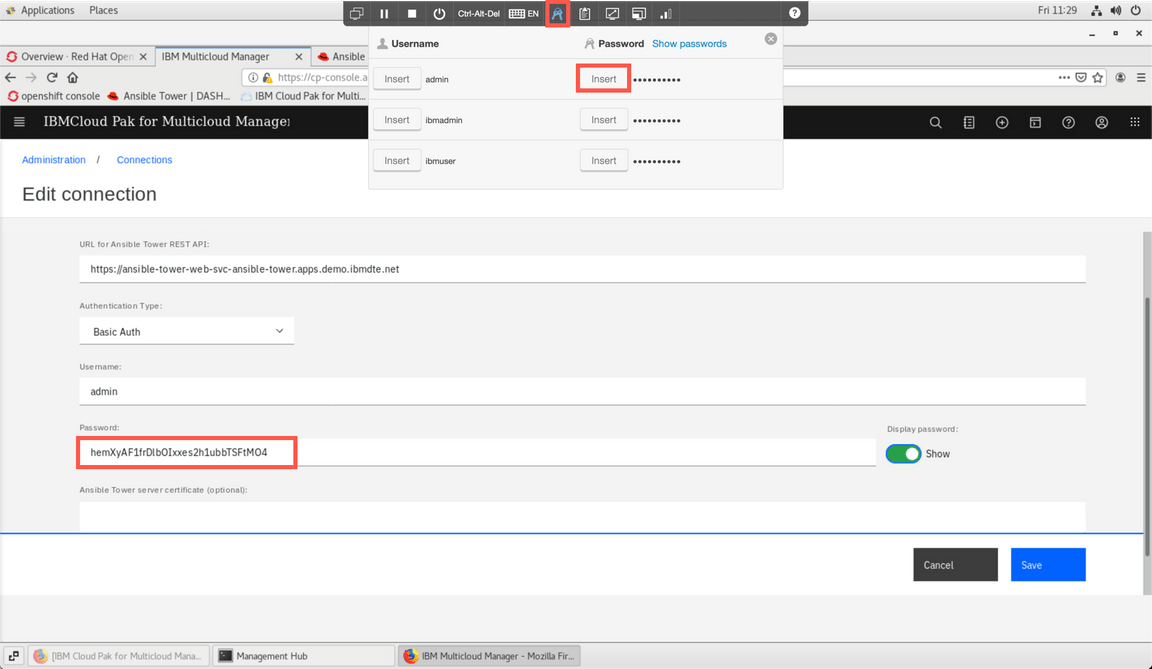
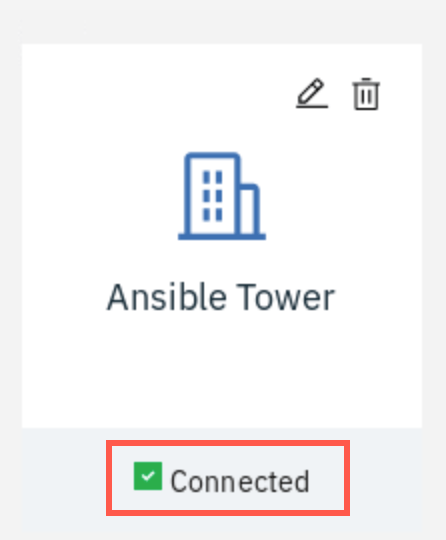
If you entered the credentials and URL correctly, you should see the green checkmark next to the Connected shown under Ansible Tower tile.
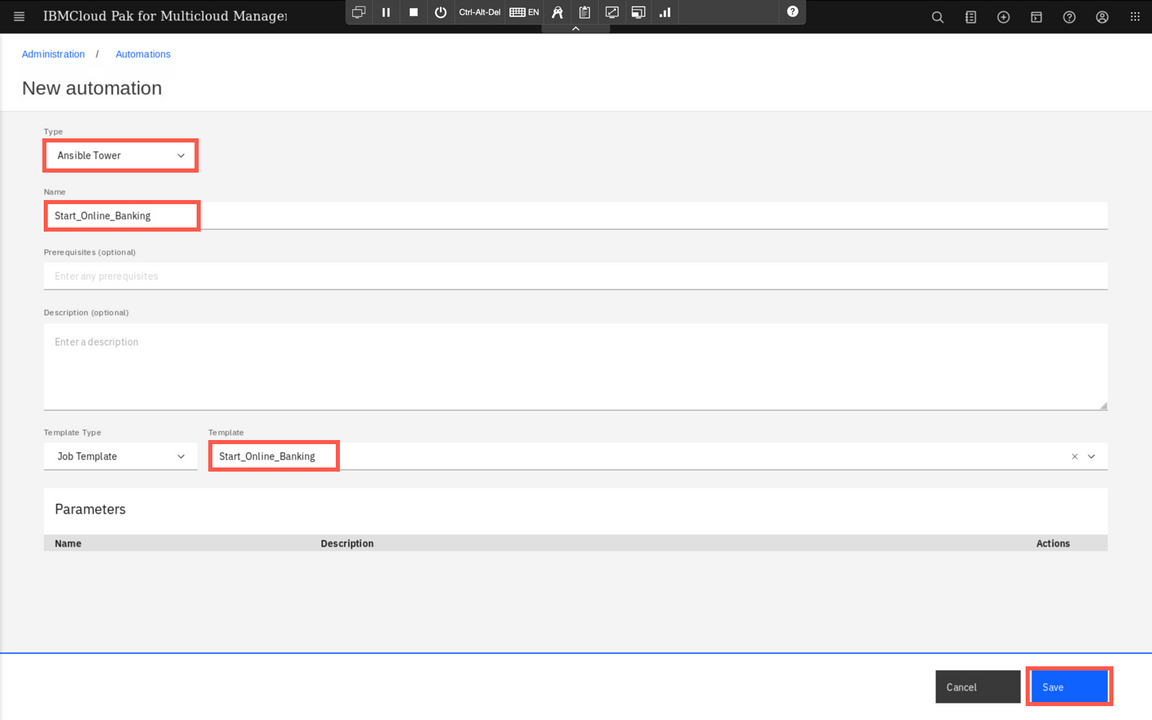
Now, select the Automations tab and click New automation.
Automations are predefined tasks that can be invoked by the operator manually during the incident or executed automatically in response to the incoming events. Select Ansible Tower as type, provide name and select Start_Online_Banking template as shown below. Finally click Save
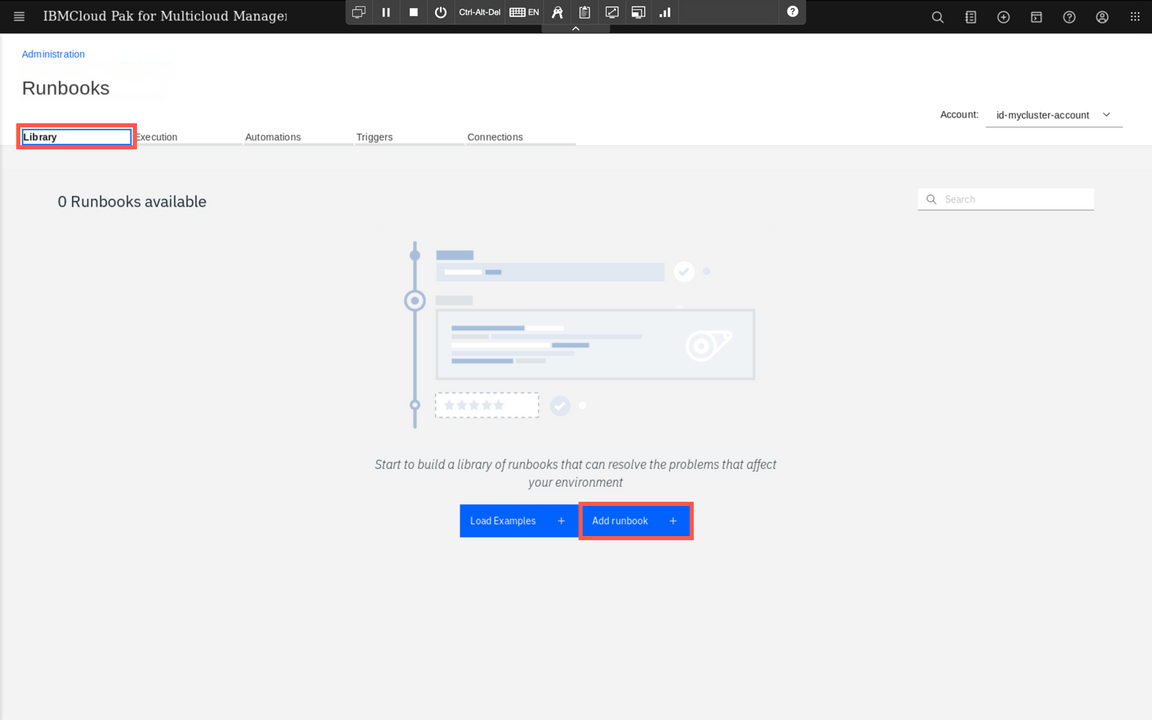
Next, you need to add a runbook. Select Library tab and click Add runbook button.
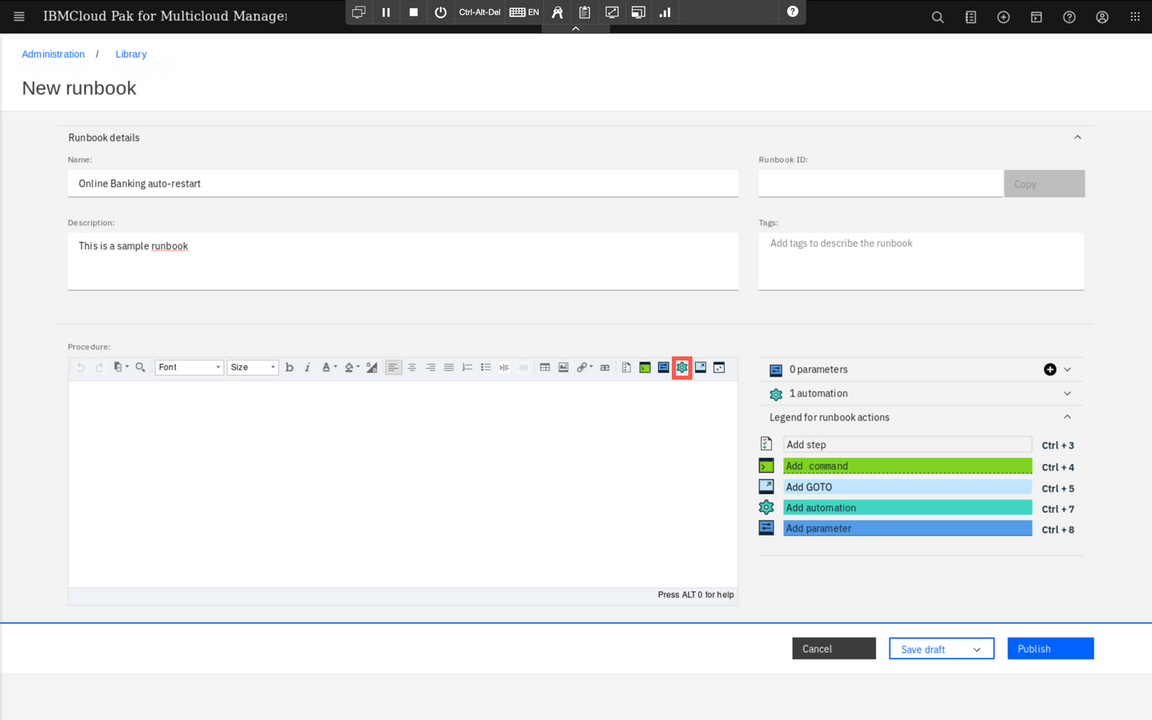
Provide the name and secription. Below, there is an editor allowing you to define a runbook content. You can define multiple steps, provide commands to be run along with the guidence for the operator who will use this later. You can also call automations and this is exactly what we want. Click the Automation icon to add previously defined automation to the runbook.
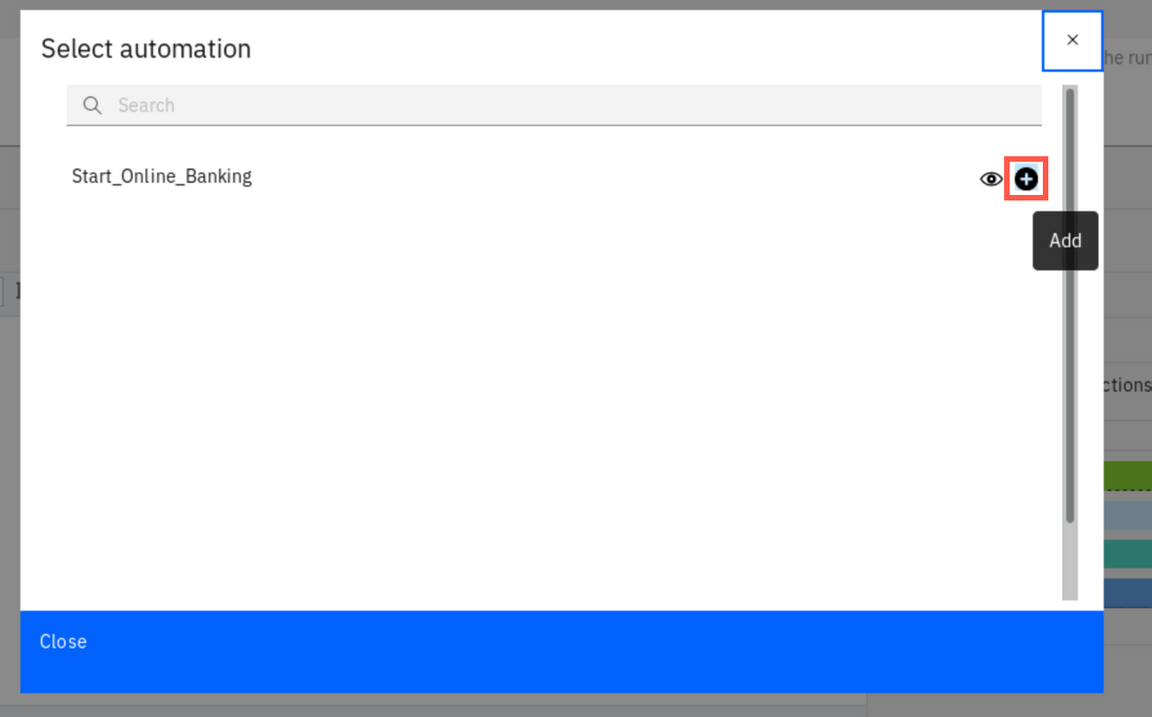
Click ’+’ sign next to Start_Online_Banking automation on the list to add automation to the runbook. On the dialog that pops up click Apply to confirm.

Finally, click Publish to complete defining the runbook.
Finally, you need to connect the runbook with the events. This is done with the Event Policy. Go back to the Administration tab and select Policies. Previously you have used this to define incident policy that sends out Slack notifications. This time you add a new event policy. Click New event policy.

Provide the name and description.
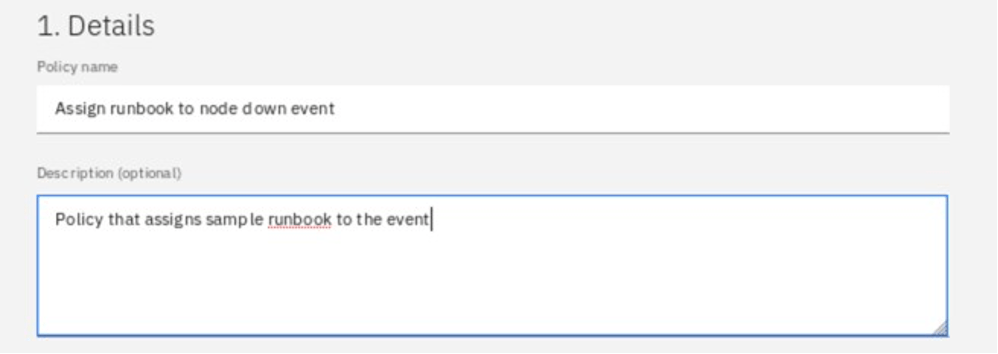
In the events section select Specify conditions and for Condition 1, change the attribute to Summary, select “contains” for the operator, and enter “node process not running” as the value.
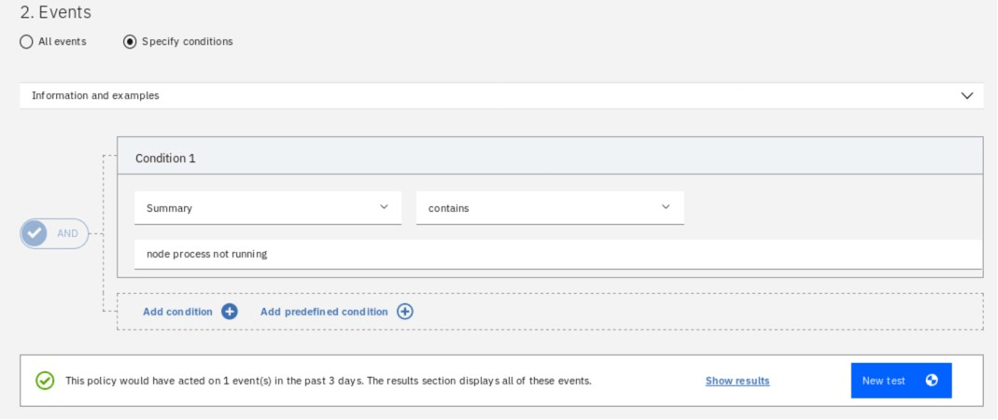
You can test the condition to verify that you haven’t made any mistake.
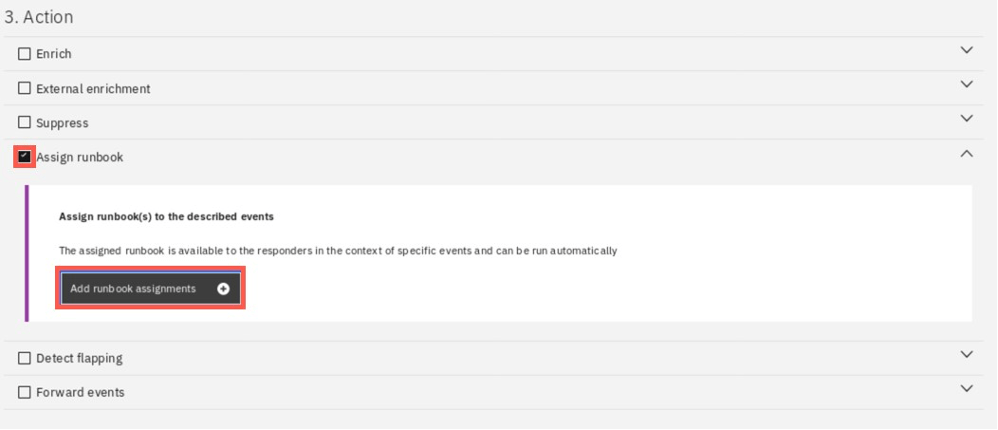
Scroll down to Action section. Select Assign runbook, and then click Add runbook assignment.
Select the available runbook and click Apply. Then, select Automatically run this runbook checkbox and click Save.
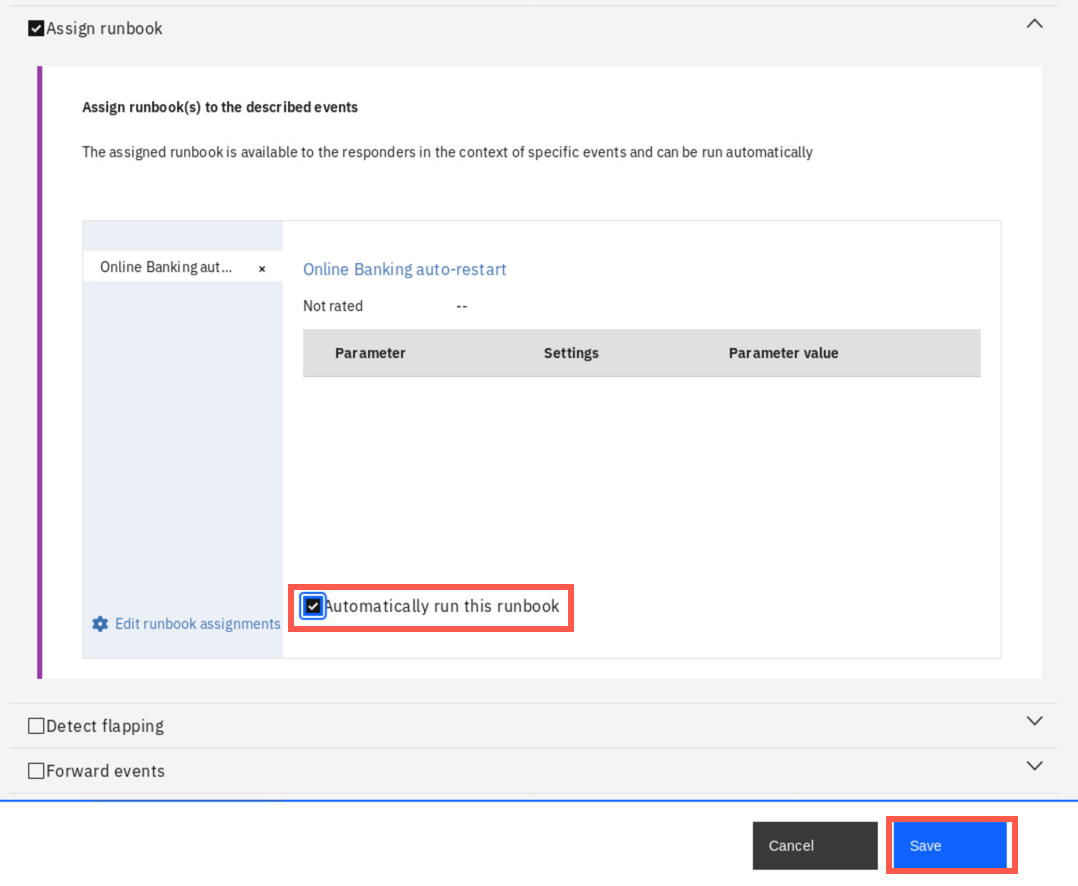
If you haven’t enabled the policy yet (it was possible during definition step), toggle the Enabled switch.

This concludes the definitions. Now, let’s check how it works in action.
Test runbook automation
Go back to the Administration tab and select Integrations. Generate again sample events. Now, go back to Administraton and select Incidents tab. Select All incidents
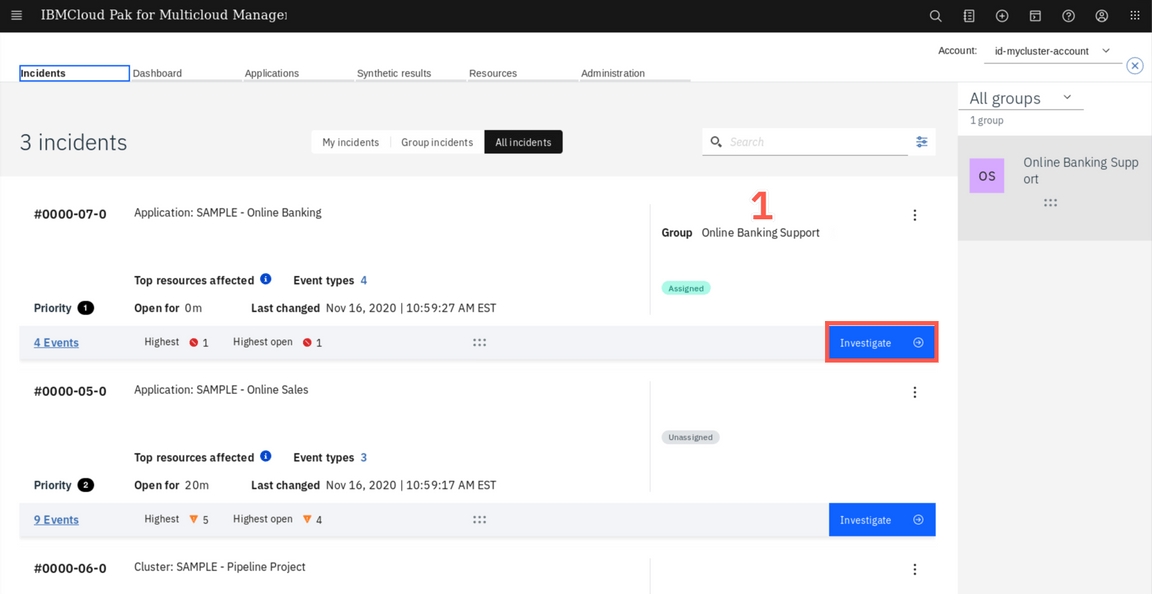
You can notice, that the incident related to the Online Banking application was automatically assigned to the Online Banking Support group. Click Investigate
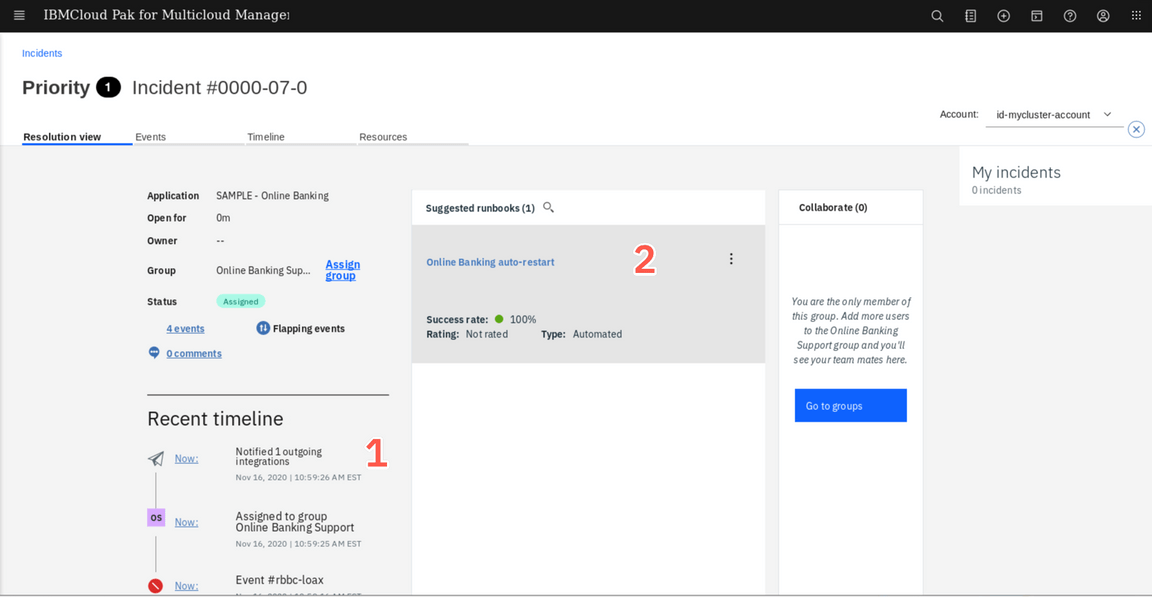
In the Resolution view, you should see that the Slack notification was send out (1), as well as that the runbook was assigned and successfully executed by the event policy.
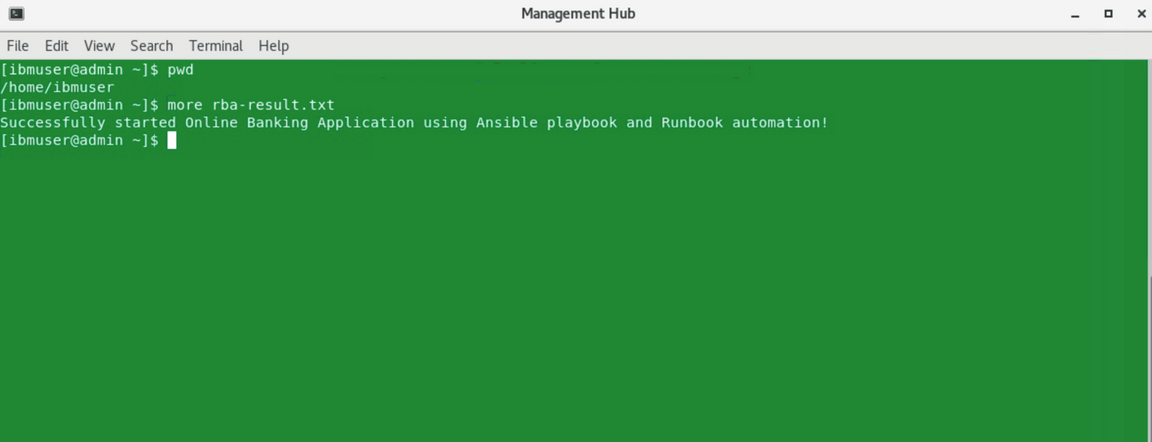
To confirm, open the Management Hub terminal on the desktop and look for rba-result.txt file.
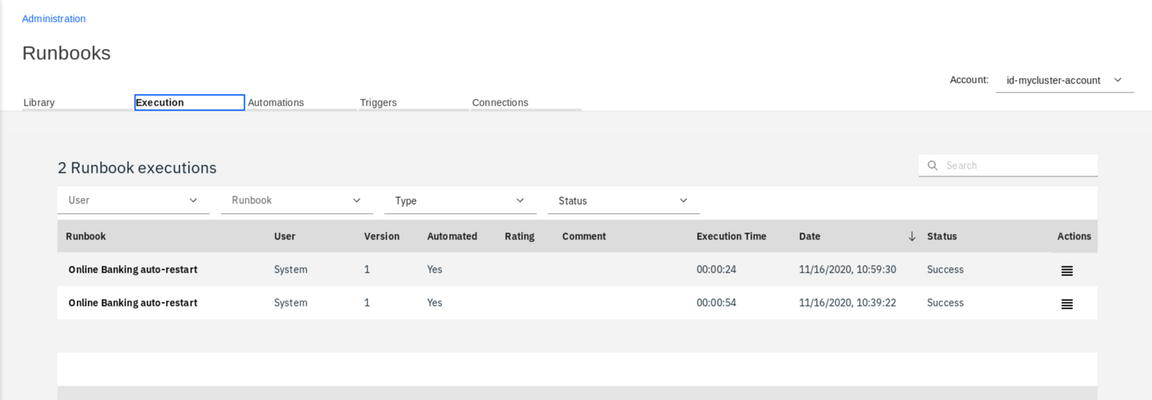
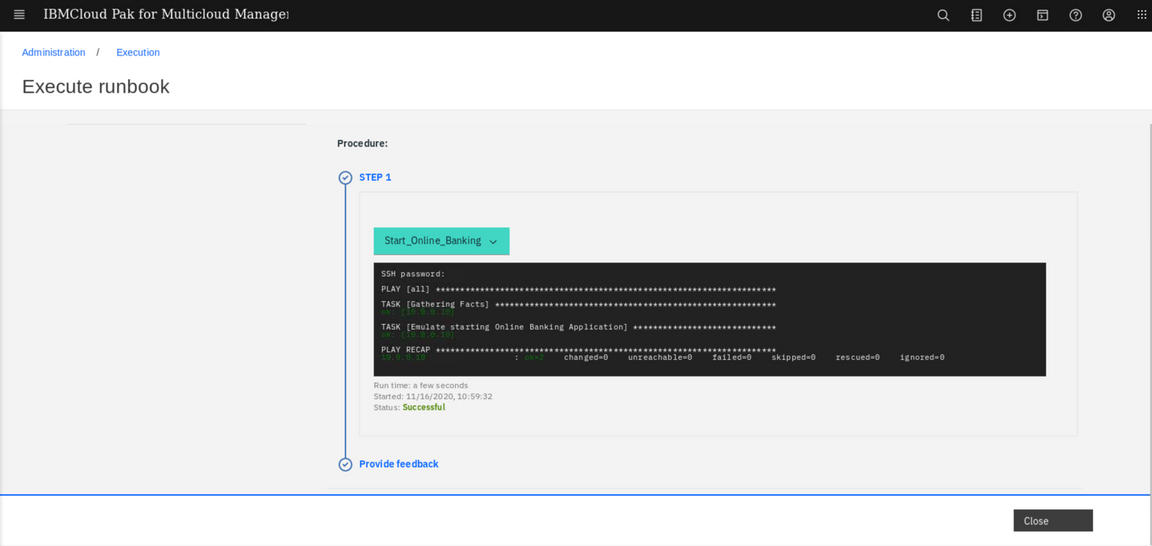
In case something went wrong and you would like to look at the details of the Ansible execution log, you can go the the Ansible Tower, or withing the Cloud Pak user interface, go to the Administration tab, Runbooks tile and look at the Executiuon tab. Here you can find the detailed log of each execution of any of the automations you defined.
Congratulations ! You have reached the end of the tutorial.
Summary
You completed the Cloud Pak for Multicloud Management tutorial: Multi-cluster Management. Throughout the tutorial, you explored the key takeaways:
Define a new support group and assign specific incidents to this groupCreate incident policy that automatically send notifications to Slack channelConfigure Ansible Tower and define new Runbook automationCreate event policy that automatically runs Ansible playbook in response to the eventGenerate sample events to verify that your new policies work as expected
If you would like to learn more about Cloud Pak for Multicloud Management, please refer to:
