Lab 1 - Multicluster Management - ROKS
- Lab Overview
- Prerequisite
- Business Context
- Add Managed Clusters
- Visualize Clusters
- Deploy an Application
- Manage Cluster Objects
- Summary
Note: ‘This lab is to be used for CP4MCM 2.1.X on ROKS.’
Lab Overview
IBM Cloud Pak for Multicloud Management provides consistent visibility, automation, and governance across a range of multicloud management capabilities such as cost and asset management, infrastructure management, application management, multi-cluster management, edge management, and integration with existing tools and processes. Customers can leverage Cloud Pak for Multicloud Management to simplify their IT and application ops management, while increasing flexibility and cost savings with intelligent data analysis driven by predictive signals.
IBM Cloud Pak for Multicloud Management can manage Kubernetes clusters that are deployed on any target infrastructure - either in your own data center or in a public cloud.
In this tutorial, you will explore the following key capabilities:
Understand Cloud Pak for Multicloud ManagementLearn how to add a managed clusterLearn how to deploy an application chart from catalogLearn how to manage cluster objects spanning multiple clusters
Prerequisite
- You need to have your personal CP4MCM on ROKS environment (check here how to request it).
- You need to pre-install all necessaries CLI tools (check here how to install them).
Business Context
As a member of the Cloud Operation team, you are having problems to manage your multicloud hybrid world. Operate your cloud-based services and data across multiple providers is overwhelming your team. Your company is deploying multiple Kubernetes clusters to address their specific needs. Some Dev teams are deploying clusters across public and private clouds, and some are deploying clusters across regions, and some are deploying clusters to support the development and test needs.
As different teams deploy more clusters, new challenges are introduced:
- Where are my services running?
- How can I monitor applications across clusters and clouds?
- How can I manage clusters as if they were one environment?
- How do I monitor usage across clouds?
- Where are the failed components?
- How do I deploy applications across these environments?
- How do I move workloads across environments?
- How do I set consistent security policies across environments?
- Which clusters are compliant?
- How can I place workloads based on capacity, policy?
Because of that, you want to explore how IBM Cloud Pak for Multicloud Management, provides consistent visibility, governance and automation of your complex environment.
In this tutorial, you use two Red Hat OpenShift cluster (ROKS) clusters.
- Hub cluster includes management console, federated monitoring, and all the controllers. In this tutorial, you identify Hub cluster as hub-cluster. Here is the OpenShift cluster.
- Managed cluster includes klusterlet components that communicate status back to the Hub cluster. In this tutorial, you identify managed cluster as managed-roks.
The relationship between hub and managed clusters is shown in the diagram below:
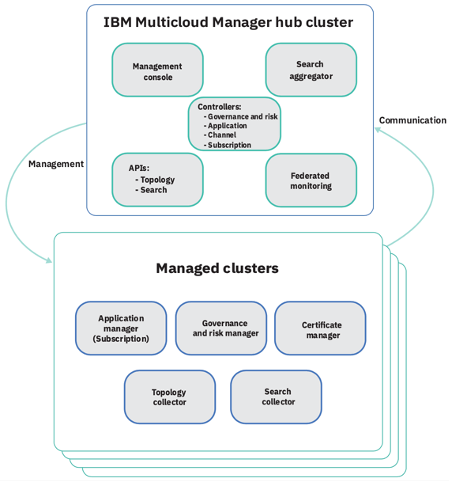
In this tutorial, you will log in to the Hub cluster to do cluster management.
You will complete the following tasks:
- Add a managed cluster
- Visualize cluster topology
- Visualize clusters and launch to each cluster
- Deploy an application chart to remote cluster
- Manage cluster objects
Add Managed Clusters
In this section, you will add two new managed clusters in your Control Panel. As explained before, you will add your OpenShift ROKS Hub cluster and your OpenShift ROKS Managed cluster.
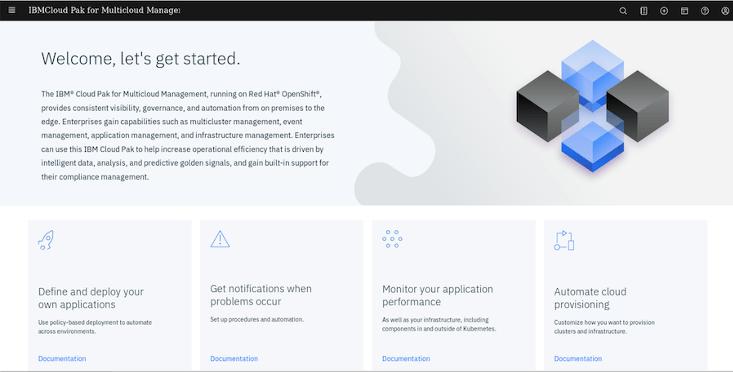
1.To start the lab, you should be in your Cloud Pak for Multicloud Management Web Console. If you are not, check here how to open your console page.
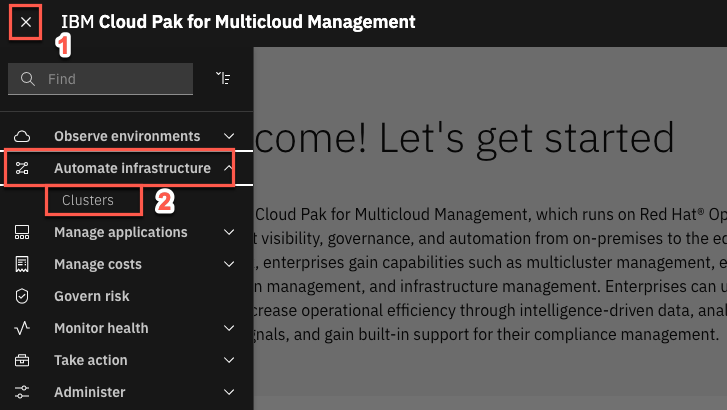
2.Now, let’s explore the Cluster view. Click the hamburger Menu (1) and select Automated Infrastructure -> Clusters (2).
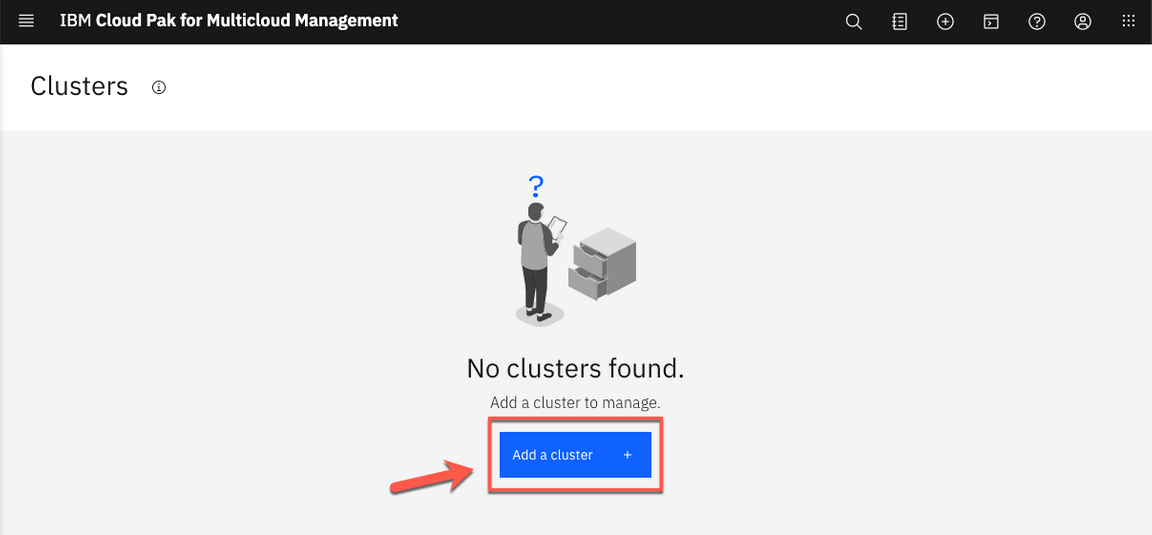
3.Initially, you shouldn’t have any cluster registered here. Let’s add our first cluster. Click Add cluster.
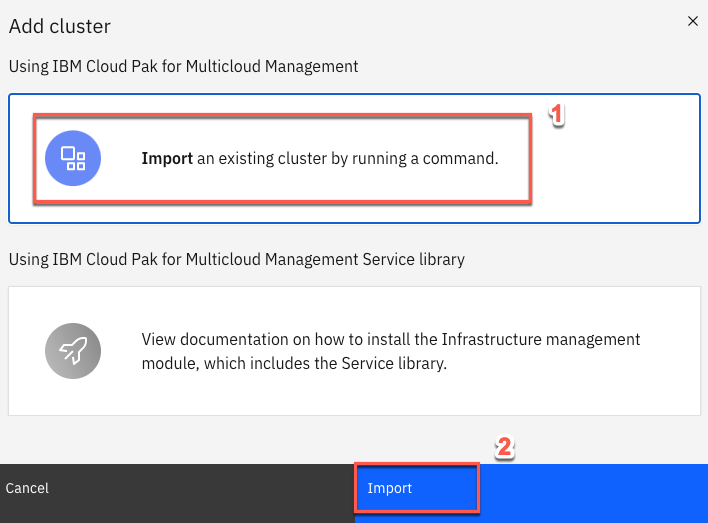
4.You can add a cluster by Importing an existing cluster or provisioning a new cluster that uses IBM Cloud Automation Manager. We use the first option. Select Import an Existing cluster (1) and click Import (2).
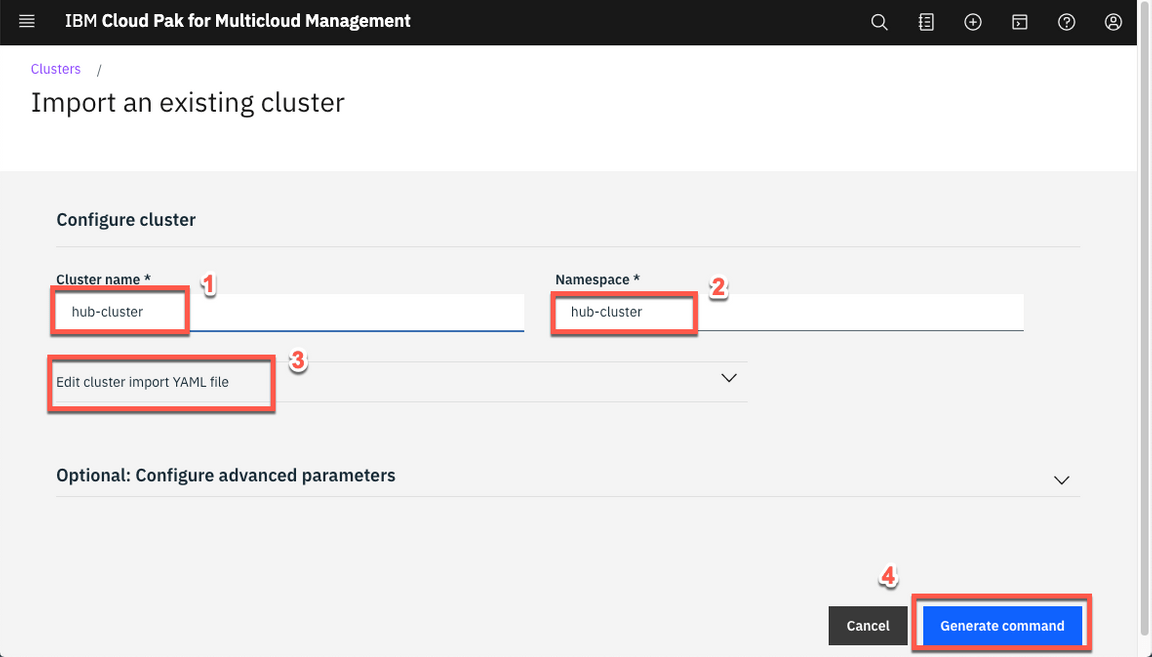
5.Enter hub-cluster for cluster name (1) and hub-cluster for namespace (2). You can view the yaml file and change the settings as needed (3). To import an OpenShift cluster no further changes are needed. Click Generate command to continue (4).
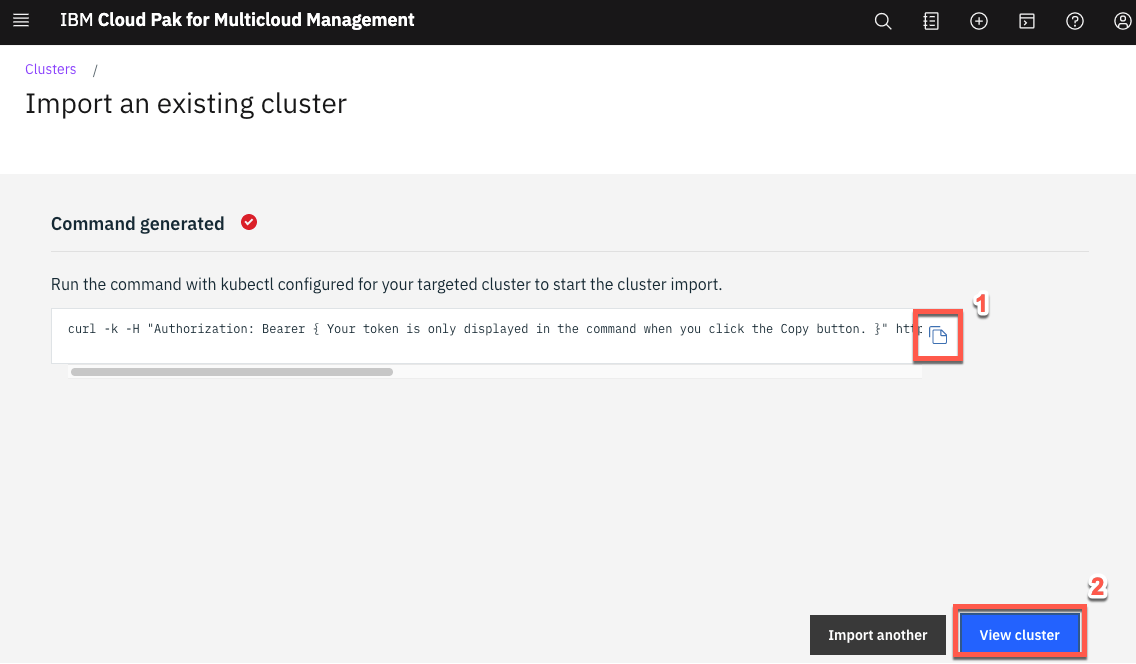
6.A curl command is generated that you will use to add the new cluster. Click Copy command button (1) and click View cluster (2) to see the new roks-cluster details page. Copy your command in a note, you will use it later.
7.Back to the Terminal window. You need to set the kubernetes to use the previous created ROKS Hub context.
To set the the context to use your Hub cluster, run the command below:
kubectl config use-context roks-hub-cluster
8.Let’s test the new context configuration. Run the command below to get the cluster nodes.
oc get nodes

Great, you are accessing the ROKS cluster. Now you are ready to execute the generated command.
9.Paste the generated command that you previously copied in the clipboard. When you run the command, several Kubernetes objects are created in the multicluster-endpoint namespace.
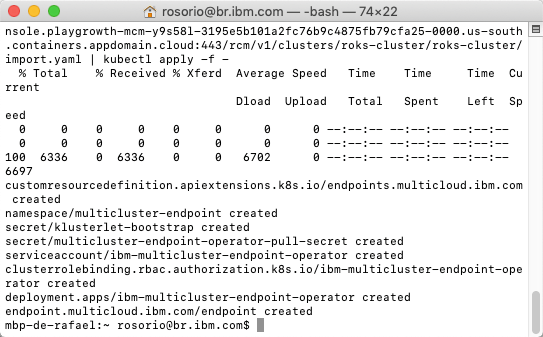
In case you will see the error: error: unable to recognize STDIN: no matches for kind Endpoint in version "multicloud.ibm.com/v1beta1". Run the command again.
10.You can view the progress by entering the command:
oc get pods -n multicluster-endpoint
Make sure all the pods are in the running state.
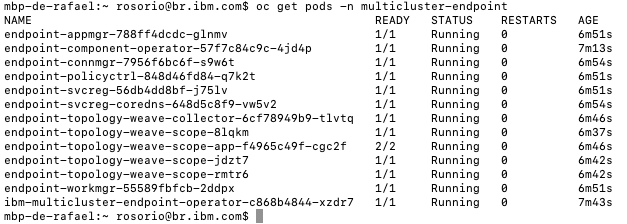
11.The cluster end point is ready when all the Pods are in Running state. Back to the browser window, make sure that the cluster status is Ready now (if necessary, refresh the details page).
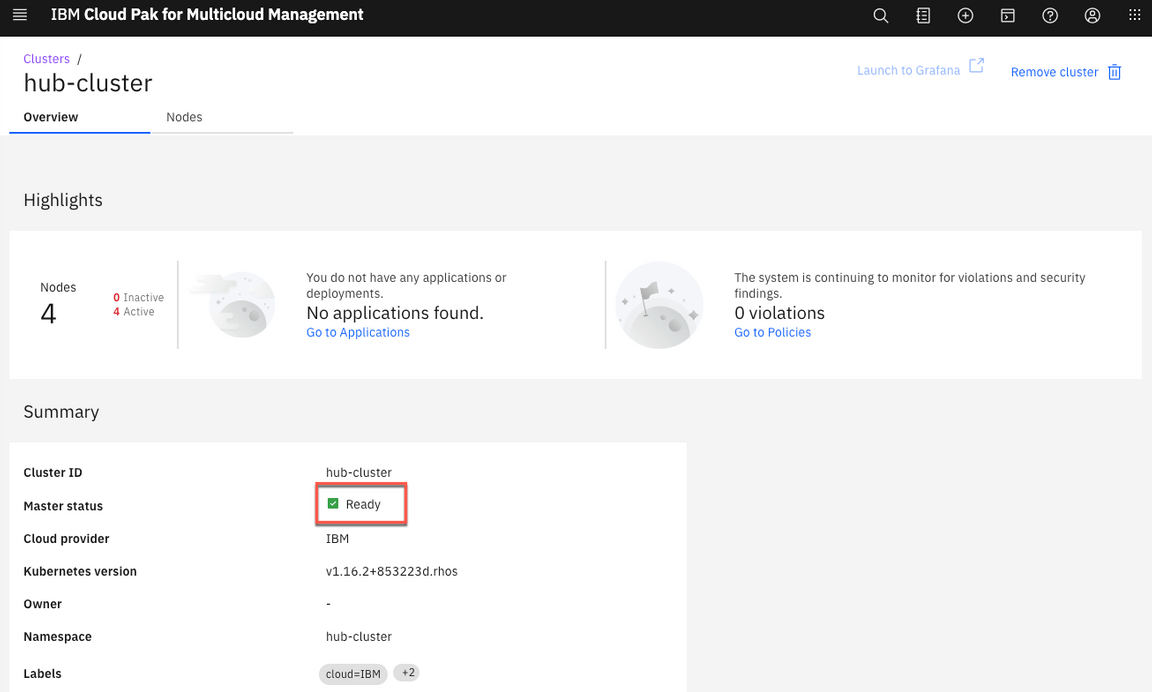
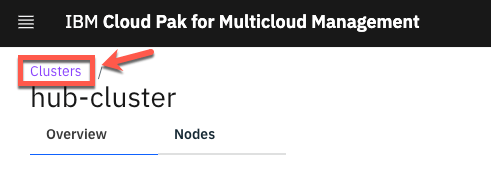
12.On the page navigation breadcrumb, click on Clusters link.
13.Now you can see your hub-cluster on the clusters list. You can add labels to identify your new cluster. On the hub-cluster row, click on the three dots icon (1) and select Edit labels (2).

14.Add a new label, environment (1), and give a value Dev (2). Click + (3) and save (4) the changes.
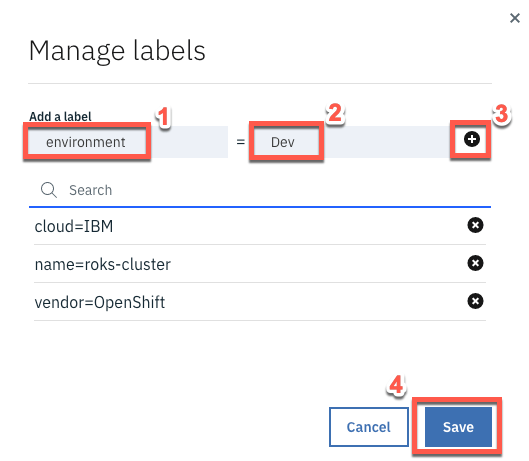
Great, your first cluster is ready! Now let’s add your ROKS Managed cluster.
15.Click Add cluster again.

16.Select again Import an Existing cluster (1) and click Import (2).

17.Enter managed-roks for cluster name (1) and managed-roks for namespace (2). Click Generate command to continue (3).
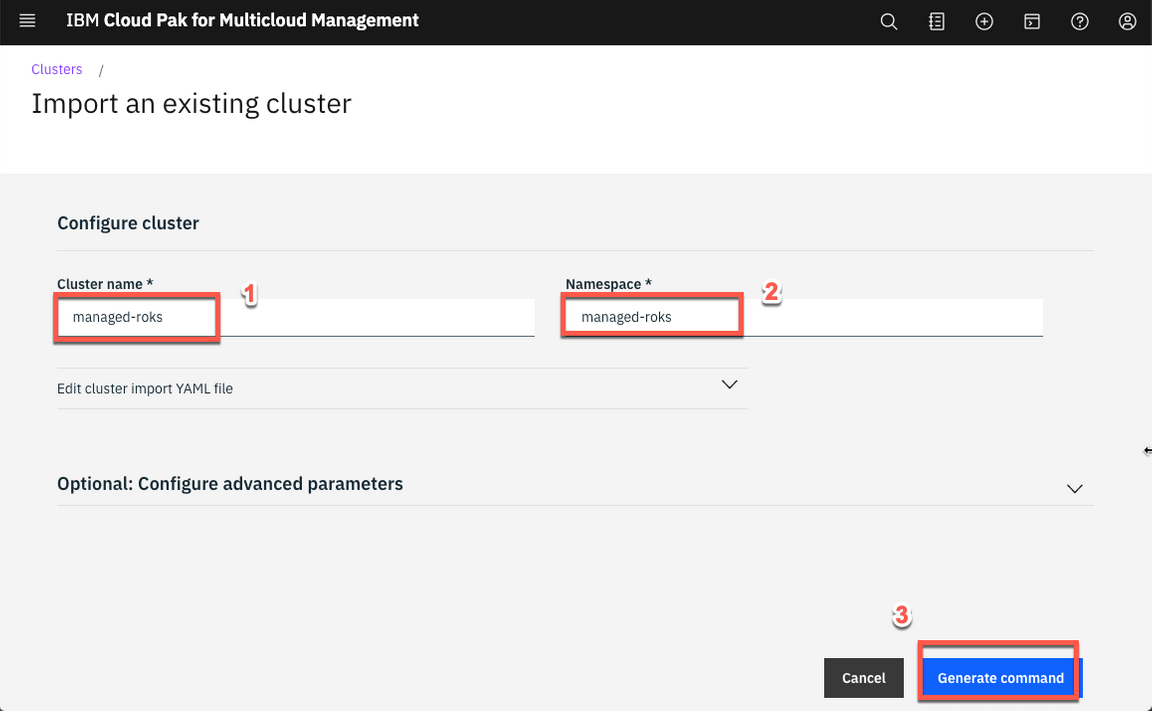
18.A curl command is generated that you will use to add the new cluster. Click Copy command button (1) and click View cluster (2) to see the new iks-cluster details page. Copy the generated command in a note, you will use it later.

19.Back to the Terminal window. You need to set the kubernetes to use the previous created ROKS Managed context.
To set the the context to use your ROKS Managed cluster, run the command below:
kubectl config use-context roks-managed-cluster
20.Let’s test the new context configuration. Run the command below to get the cluster nodes.
oc get nodes

Great, you are accessing the ROKS Managed cluster. Now you are ready to execute the generated command.
21.Paste the generated command that you previously copied in the clipboard. When you run the command, several Kubernetes objects are created in the multicluster-endpoint namespace.
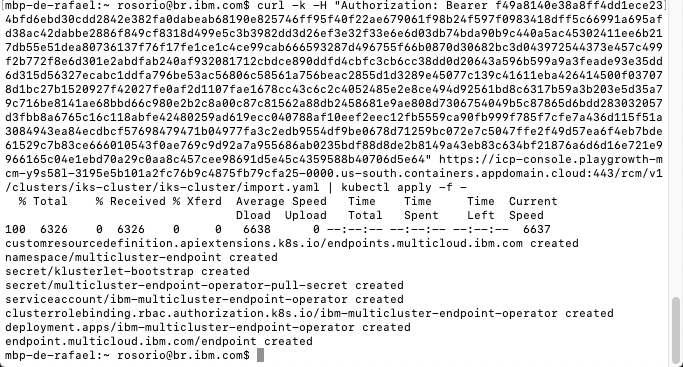
In case you will see the error: error: unable to recognize STDIN: no matches for kind Endpoint in version "multicloud.ibm.com/v1beta1". Run the command again.
22.You can view the progress by entering the command:
oc get pods -n multicluster-endpoint
Make sure all the pods are in the running state.

23.Back to the browser window, make sure that the cluster status is Ready now (if necessary, refresh the details page).
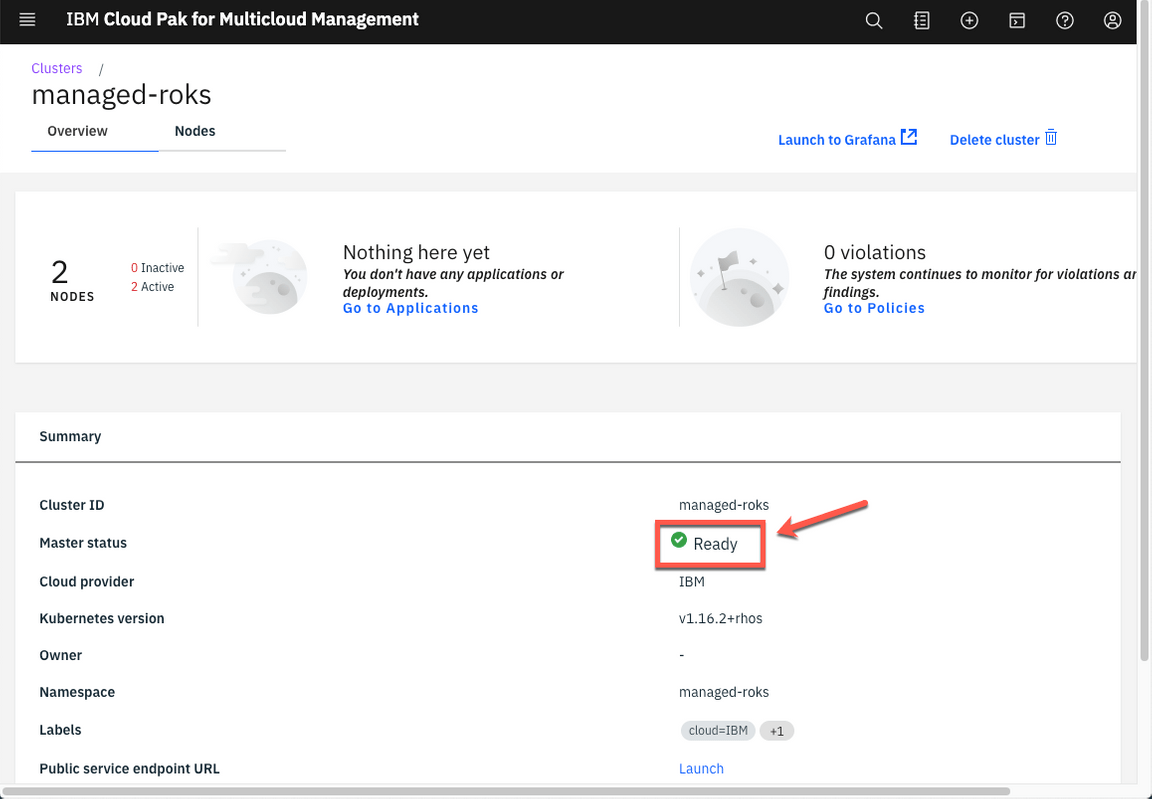
24.On the page navigation breadcrumb, click on Clusters link.

25.Now you can see your managed-roks on the clusters list. You can add labels to identify your new cluster. On the managed-roks row, click on the three dots icon (1) and select Edit labels (2).
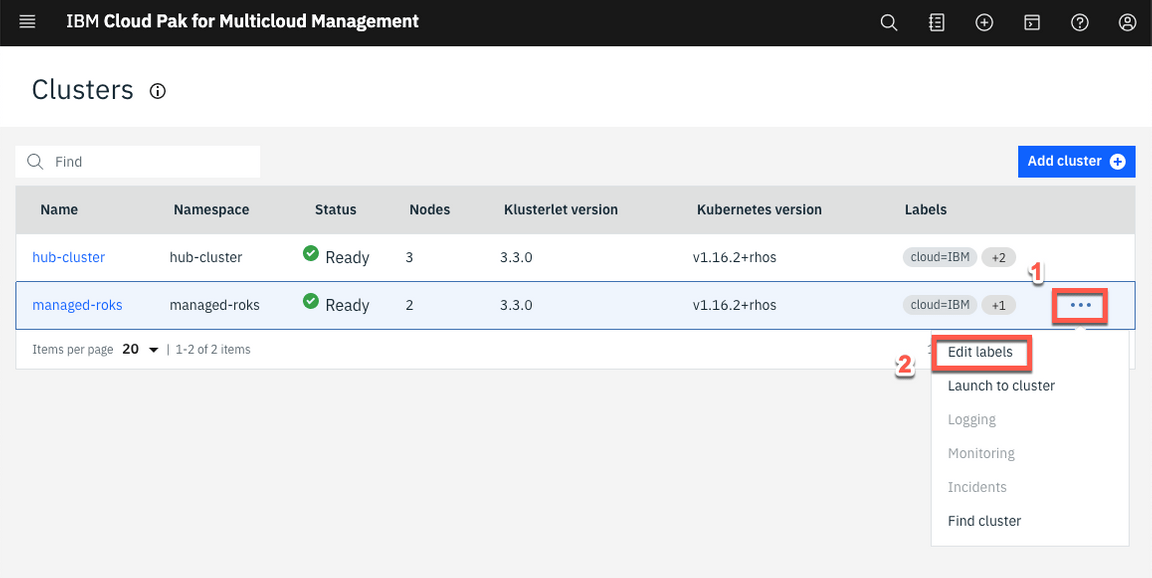
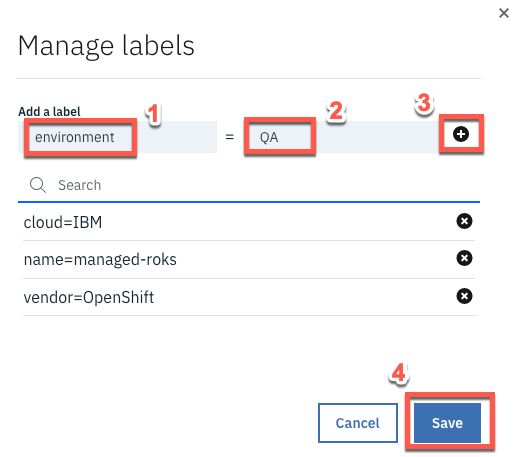
26.Add a new label, environment (1), and give a value QA (2). Click + (3) and save (4) the changes.
Great, your both clusters are ready and managed by IBM Cloud Pak for Multicloud Management. Using this Pak, you are able to manage both cluster from a single pane of glass. Let’s check it in the next section.
Visualize Clusters
In this section, you visualize clusters in a tabular view.
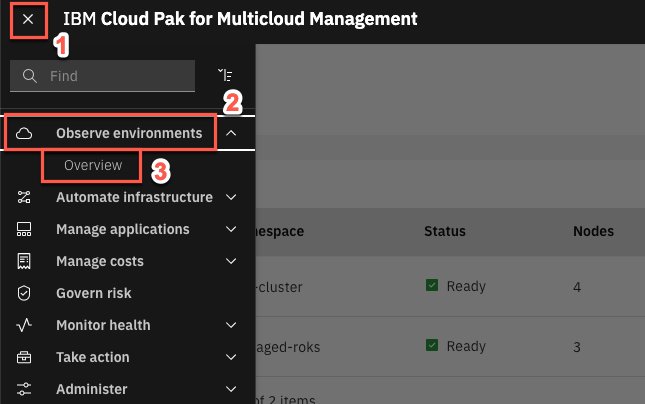
1.With IBM Cloud Pak for Multicloud Management you are able to manage all your cluster from a single control panel. Open the Menu button (1) and click Observe environments (2) > Overview (3).
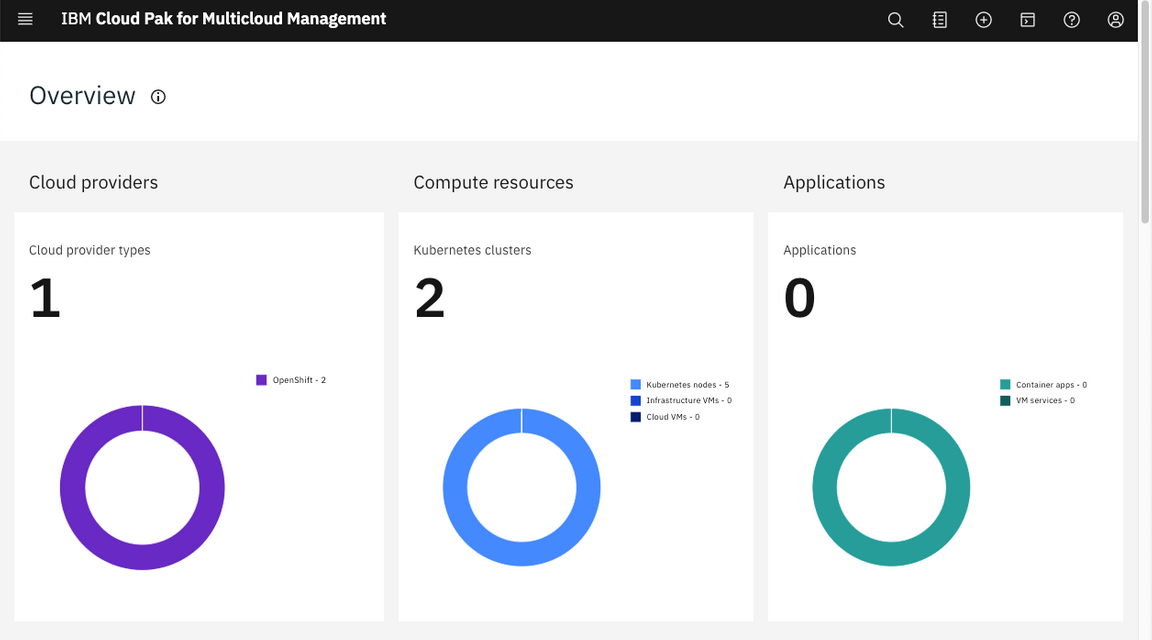
2.The Overview menu option displays the status of all clusters including the health and resource metrics. The top section shows the operations details across all your cloud providers. In the first section, you can see information about cloud providers, compute resources, applications and infrastructure. Because your both clusters are completely new, you don’t have a lot of information here. But in a real production environment here is your starting point to explore your multiple clusters.
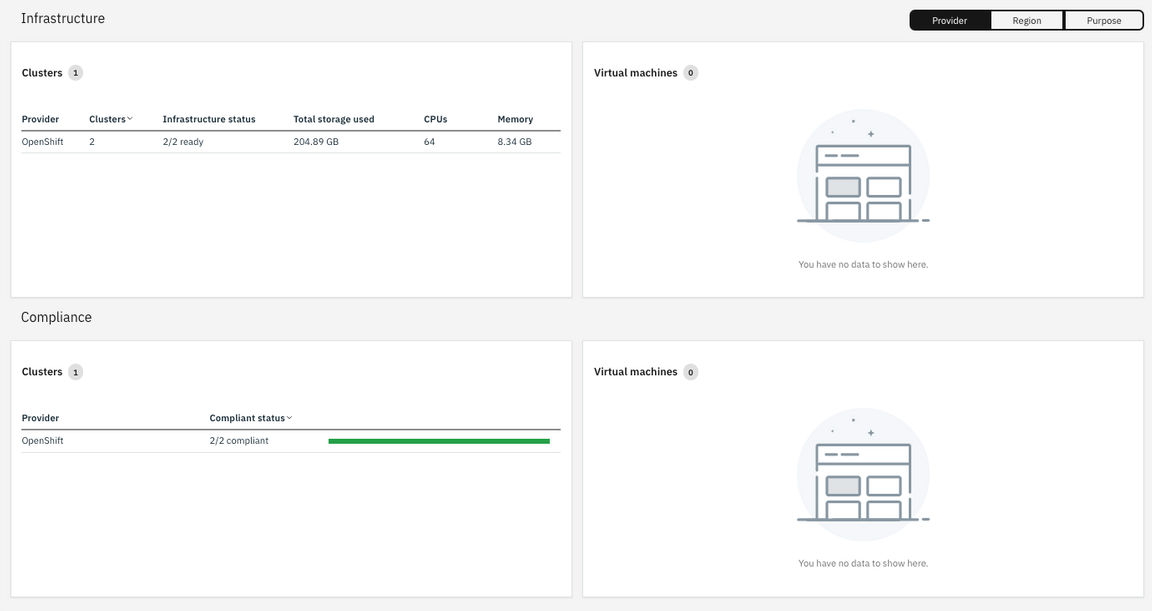
3.The bottom section shows Resource Overview. Here you can see Cluster Compliance status, Cluster status, CPU, Memory, and Storage Resource View.
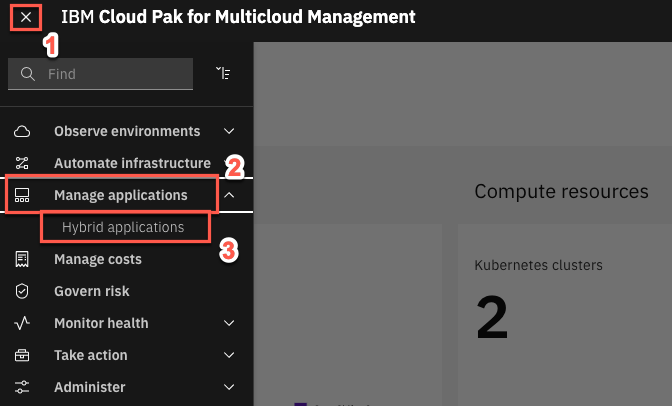
4.Now, navigate to the Applications page. Select “hamburger” menu in the top-left corner (1) and then Manage applications (2) and Hybrid applications (3).
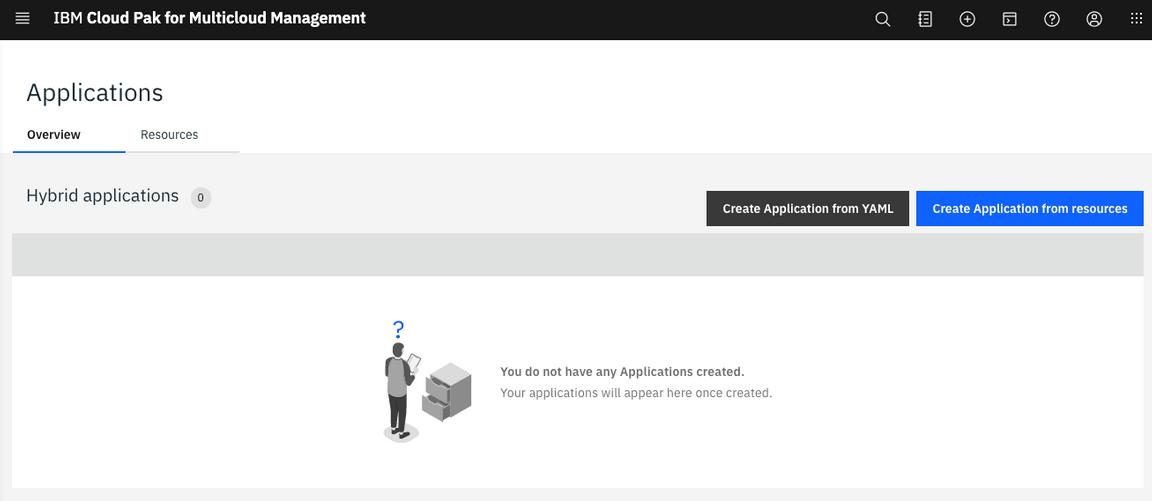
5.By now, you don’t have any application here. But it is important to know, that in this area, you will see information about the deployment of an application. Don’t worry about it now, you will explore it later.
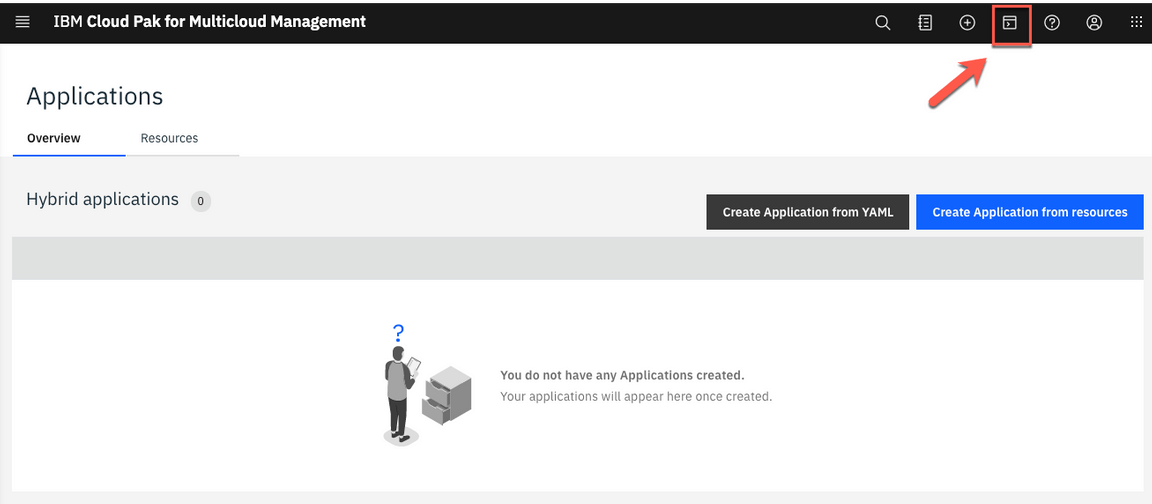
9.Now, let’s explore a really good feature of Multicloud Management: Visual Web Terminal. On the top right navigator, click on Visual Web Terminal button.
10.You can use the Visual Web Terminal to run many commands across your environment. When categorized data is returned, such as when you enter a search command, it is returned in an interactive tabular format.
The Visual Web Terminal is particularly useful when troubleshooting issues that require running multiple commands and navigating the results of the commands in an easy way. Let’s try something simple! Enter the command bellow:
oc project multicluster-endpoint
oc get pods
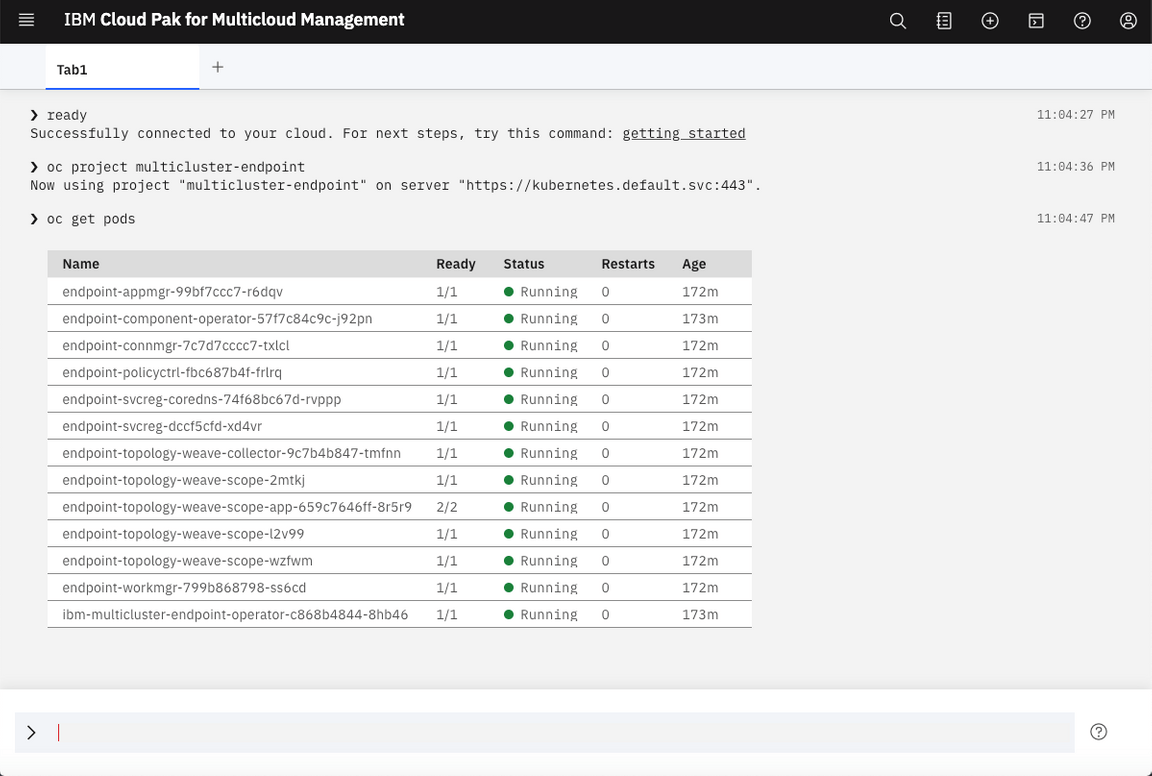
The information that is provided in the Visual Web Terminal is limited by the permissions of the user. When you run a command, only the items that you have permission to view are displayed.
Next section, you learn how to deploy an application to the local or remote cluster.
Deploy an Application
In this step, you install a helm chart from the catalog to your hub-cluster and your managed-roks cluster. Let’s do it!
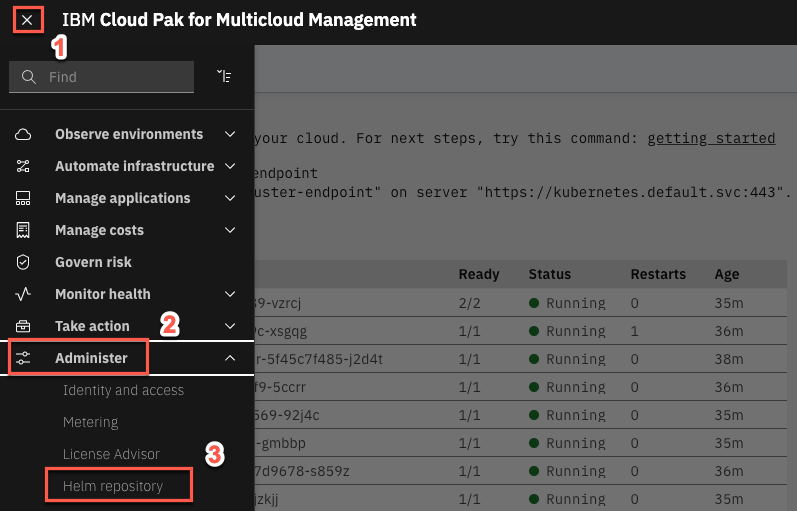
1.Open the Menu (1) and click on Administer (2) > Helm repository (3).
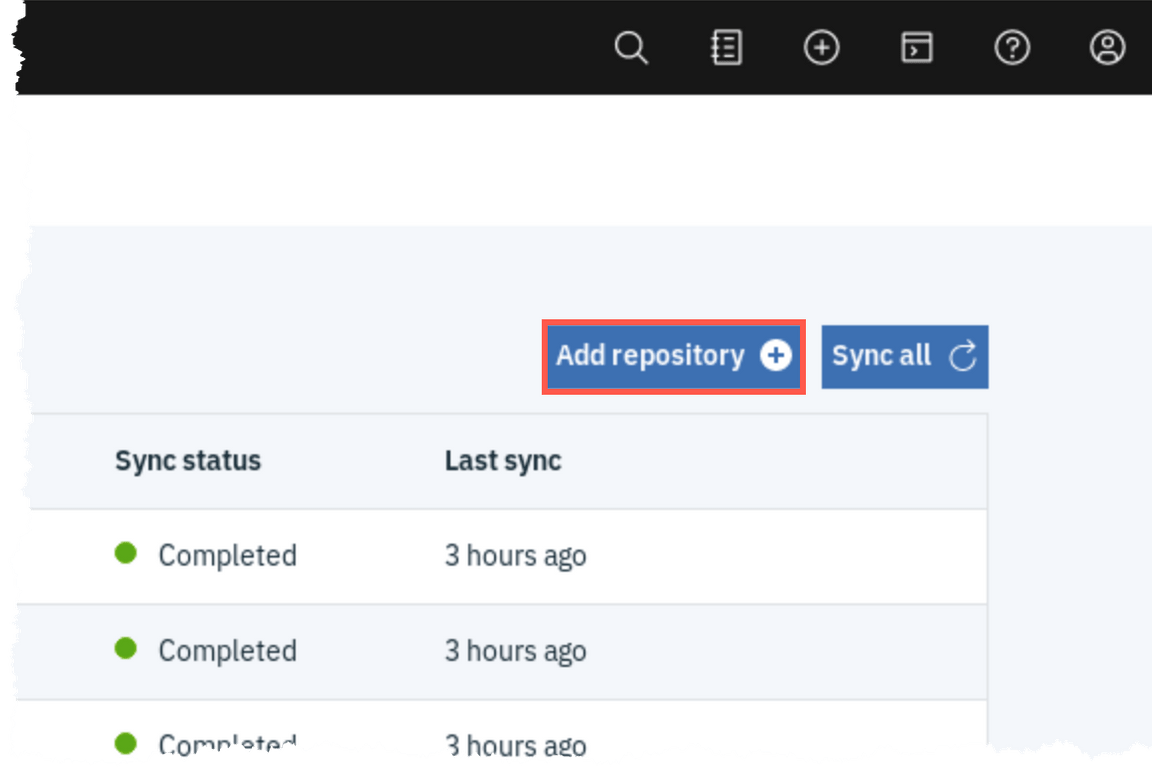
2.On the Helm Repositories page, click Add Repository to register a new Helm Repository.
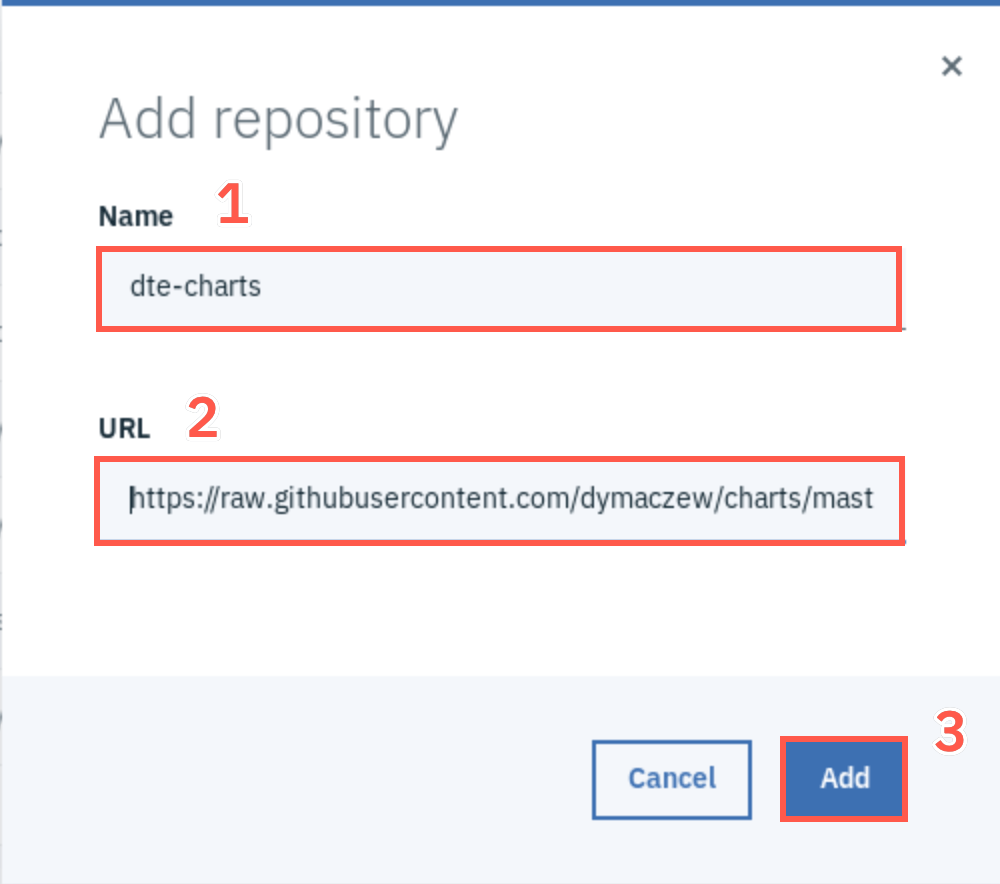
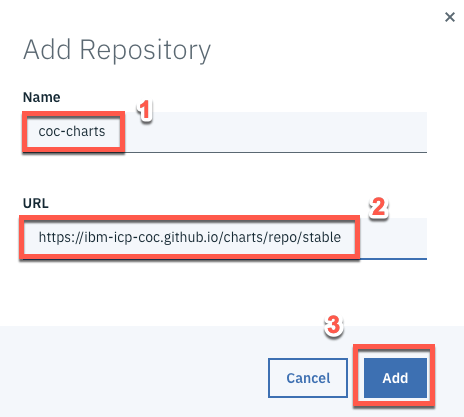
3.Enter dte-charts (1) as repository Name, and enter https://raw.githubusercontent.com/dymaczew/charts/master/repo/incubator as URL (2). Click Add (3).
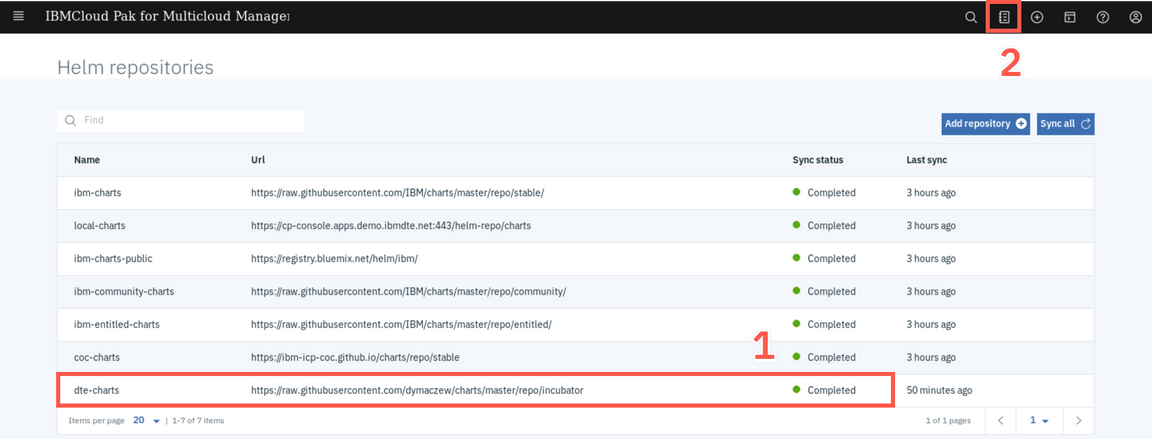
4.After few seconds, you should see Sync Status as Completed (1). Now, let’s deploy an application from this new Helm repository. Click Catalog (2) on upper right corner of the page to view the list of helm charts that you can deploy.
5.Search for mod (1) and select modresortapp (2) application.
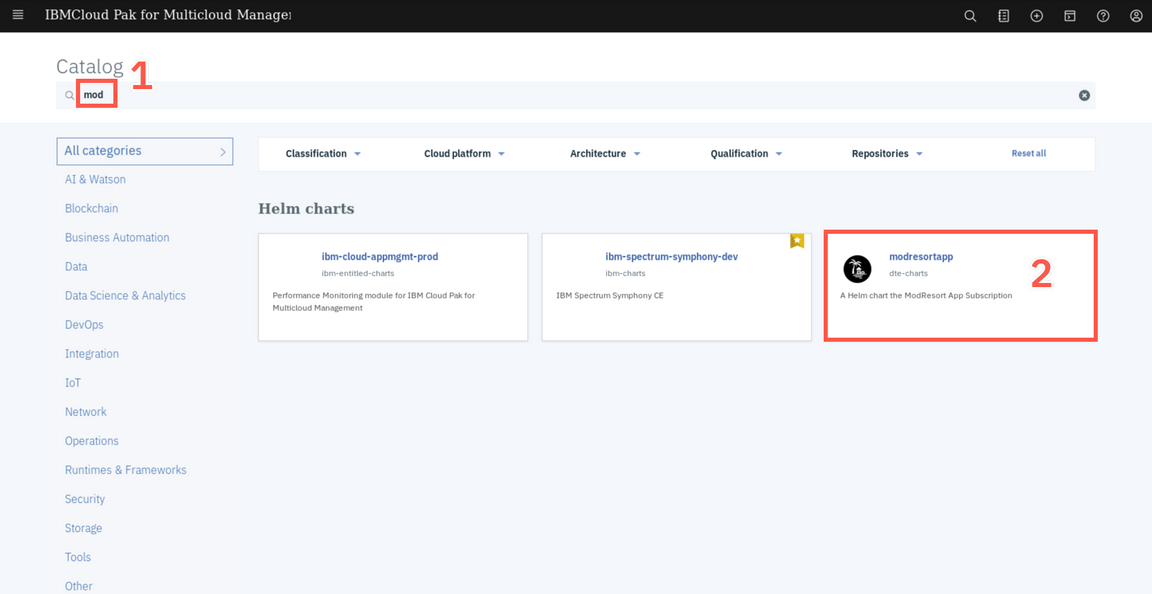
6.The chart deploys a simple Liberty web application for demonstration purposes. Select Configure to continue.
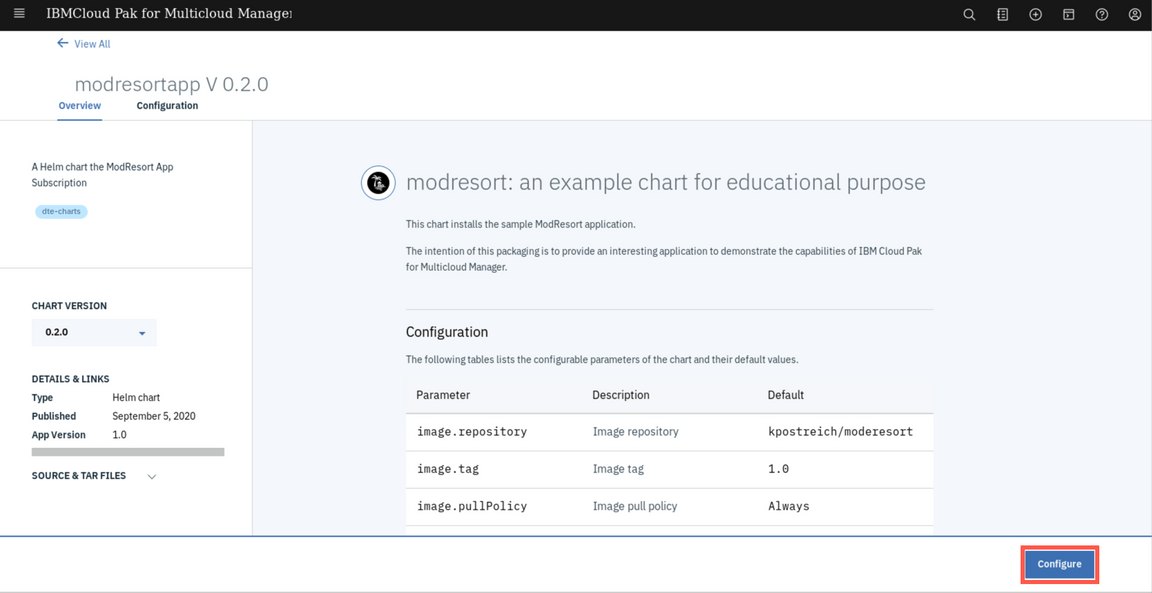
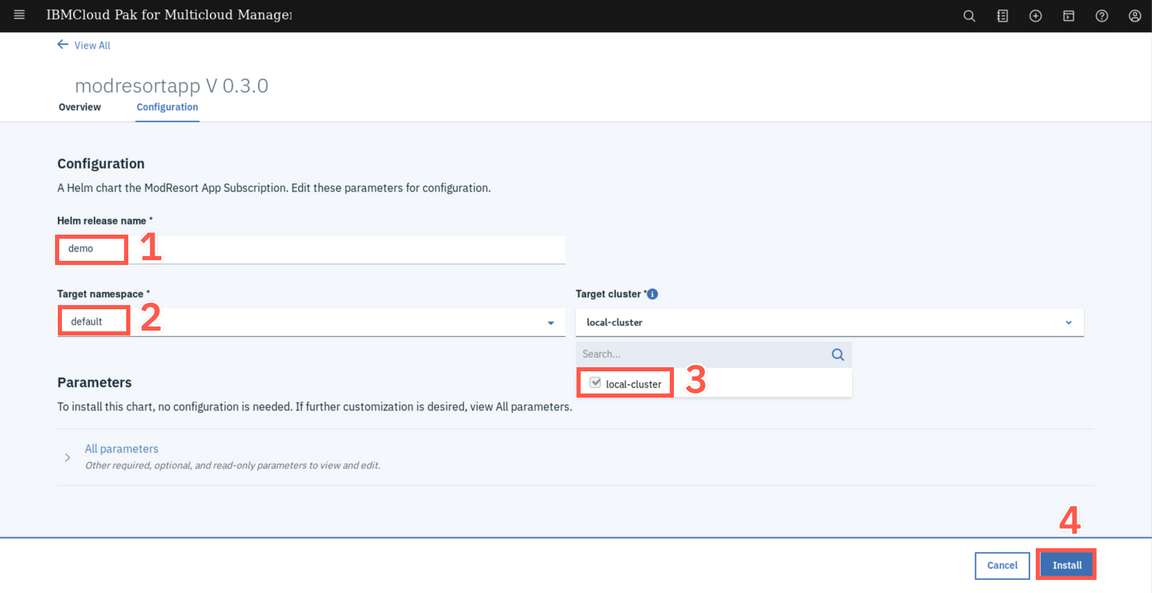
7.Enter demo as Helm release name (1), select default as Target namespace (2). On Target cluster, select the local-cluster (3). Then click Install (4).
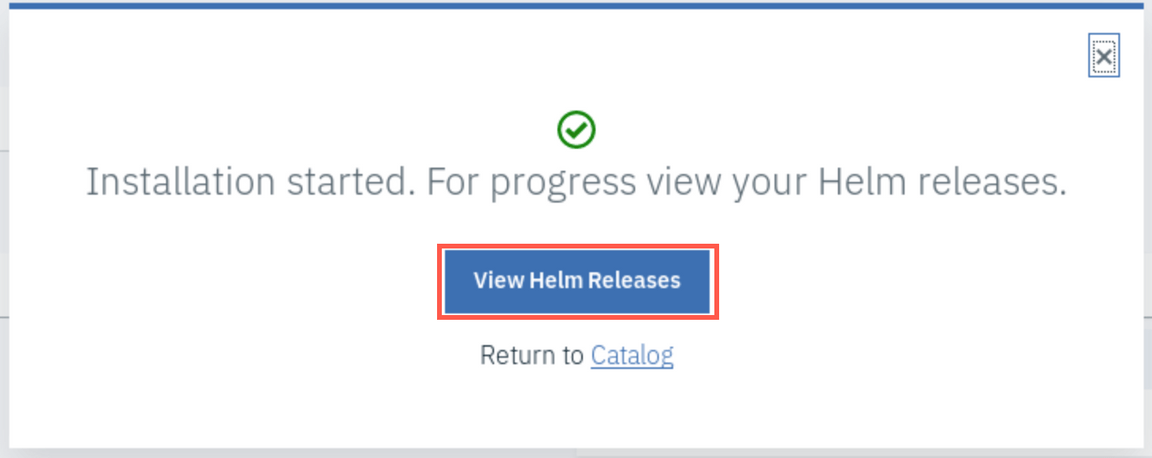
8.The installation starts immediately but it takes a few minutes to deploy the application to remote cluster. Click View Helm Releases to view the status.
9.On the Helm releases page, you can check that demo helm is deployed to your Hub cluster.

10.Now, go back to the Hybrid applications menu, Menu hamburger -> Manage Applications -> Hybrid Applications. You can notice that now it shows your just deployed application. Click the demo-modresrtapp application.
NOTE: if you don’t see the Manage Applications option in the menu, change your browser url and remove the /catalog/instances context.

11.You should see the details of the sample application, as shown below. Click on any of the icons to see the details of each object.
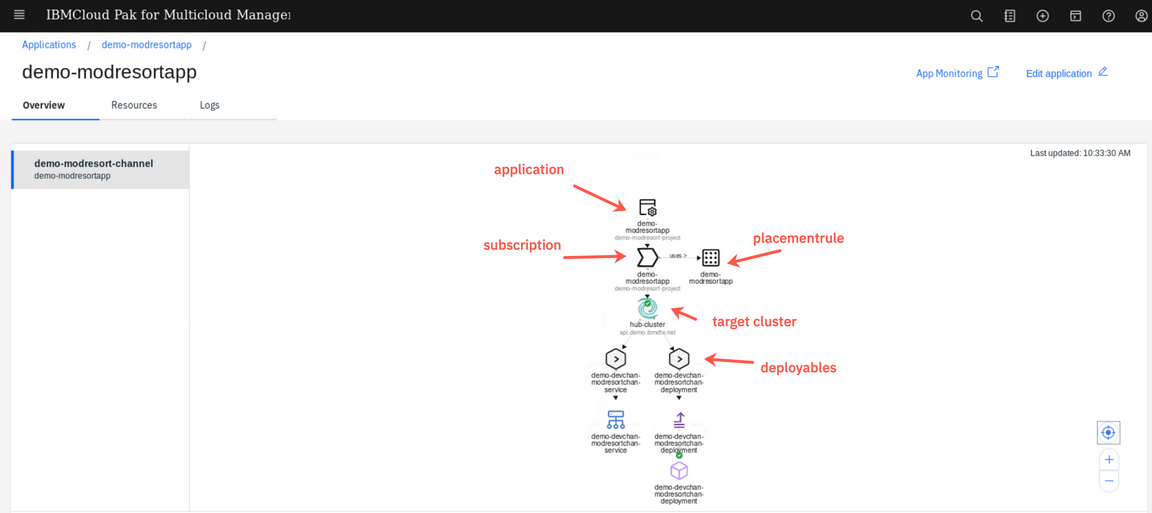
12.Click the demo-modresortapp placement rule (1) and notice that it defines the placement of the application to the clusters with label environment=Dev (2). It also specify that one instance of the application should be deployed in case more clusters is labeled this way.
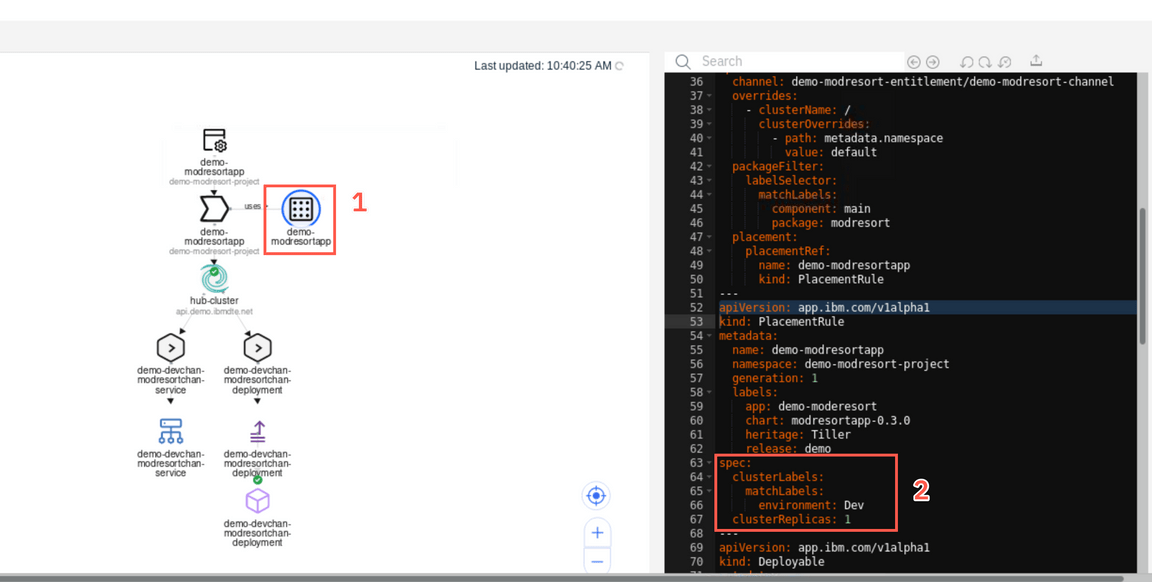
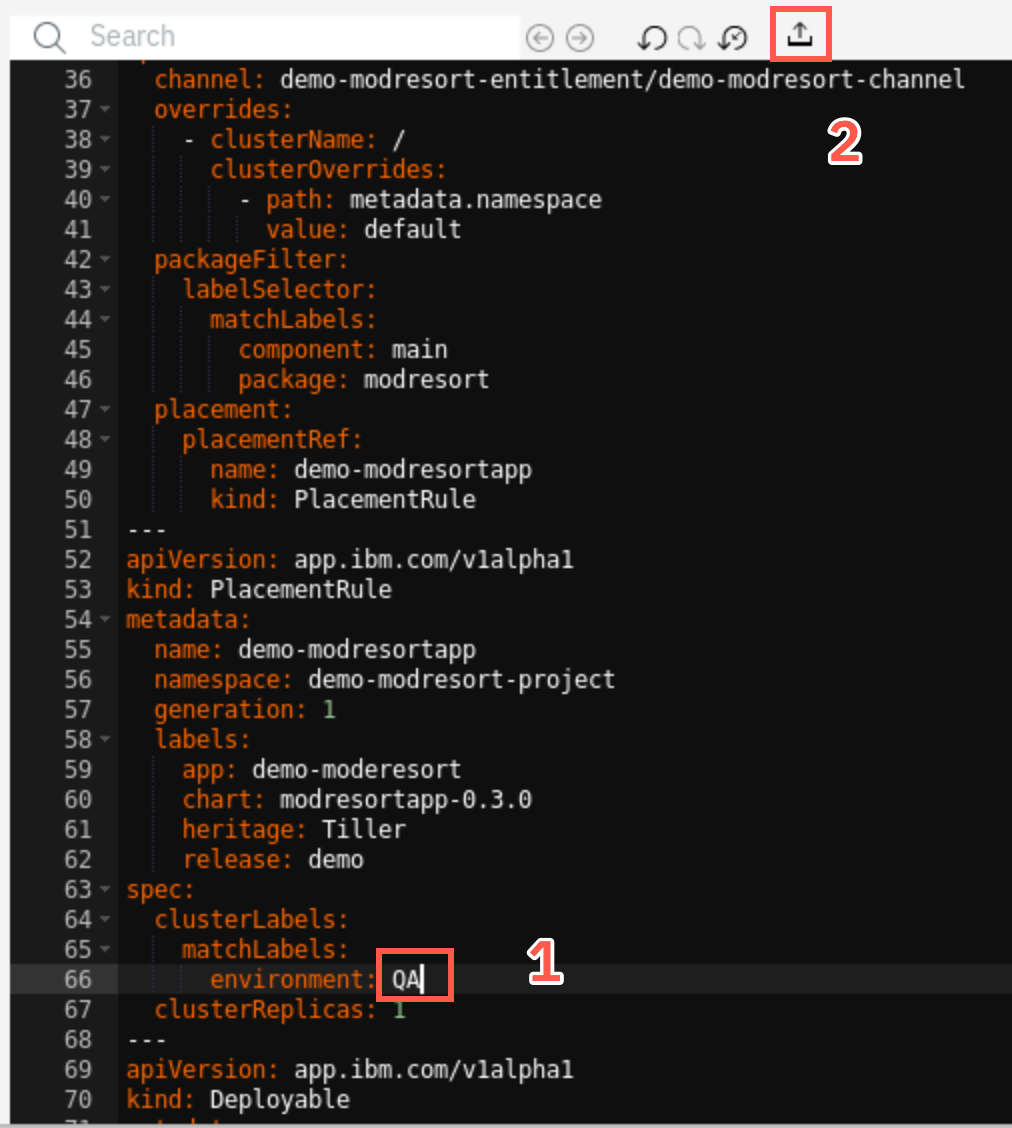
13.Let’s modify the target cluster. Edit the label in the yaml file on the right (1) changing the Dev to QA and apply the changes with the Update icon (2)
14.In a short time you should notice that the placement rule change is picked by the system and the different target cluster is designeted as a target for deployment.
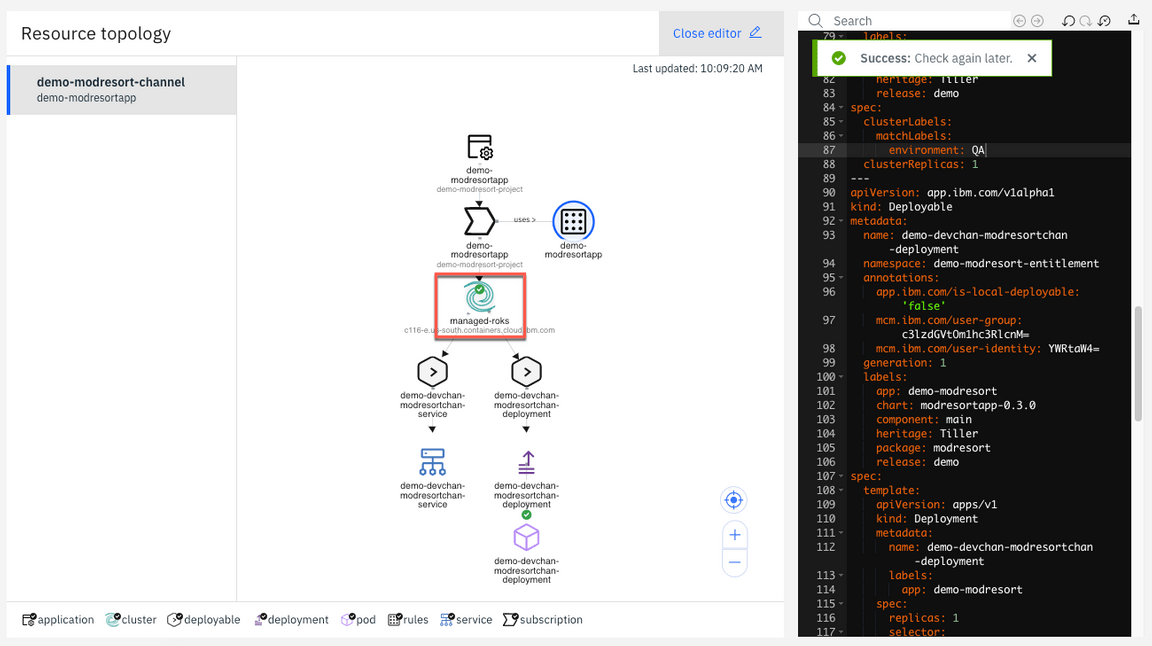
15.Let’s verify that the application is actually running on Managed ROKS cluster. Go back to the terminal windows and run the following commands:
kubectl config use-context roks-managed-clusteroc project defaultoc get podsoc get service
16.Now that you know the service name (demo-devchan-modresortchan-service), let’s create a route by exposing our service using the command below:
oc expose service demo-devchan-modresortchan-service
17.View your new route:
oc get route | grep demo

Copy the route of your application.
18.Back to your browser window, open a new tab and enter the url below, where [exposed-route]is the route copied in the previous step.
http://[exposed-route]/resorts
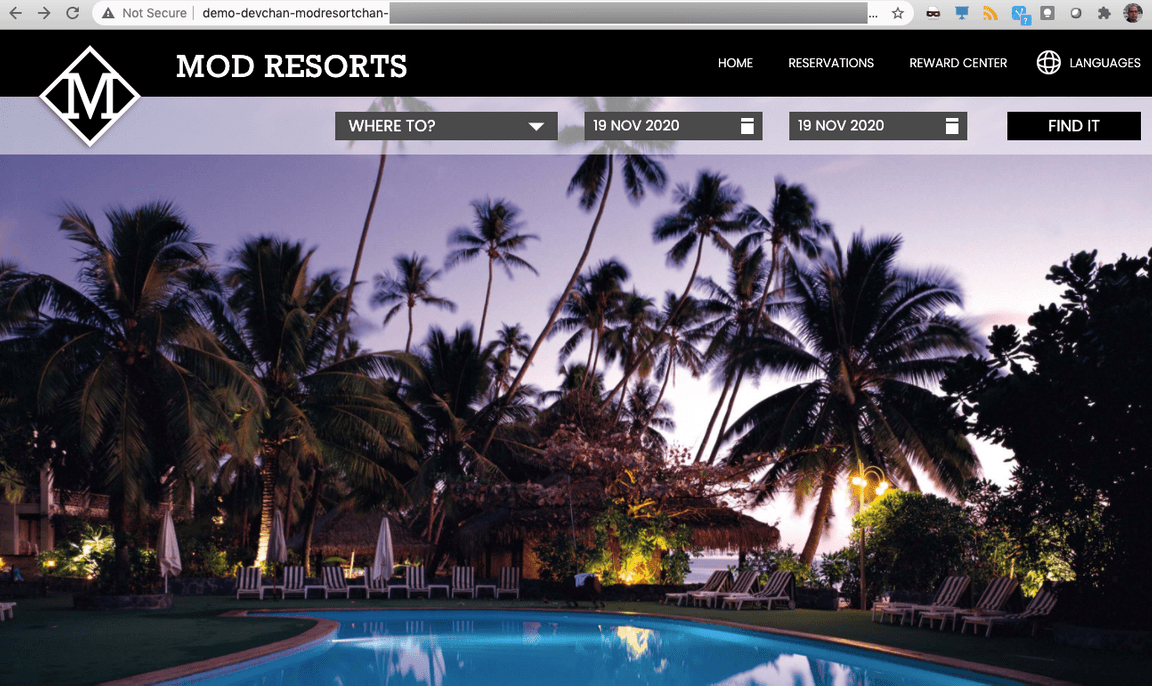
19.Great! Your Liberty application is available on your managed-roks cluster.
This application is really a simple sample, just to show you how easy is to install an application from the catalog in multiple clusters. In our next lab you will deploy a hybrid application learning details about Application Management deployment using channels and subscriptions concepts.
Manage Cluster Objects
You can use the management console to create, manage, view details, and troubleshoot application resources and Kubernetes objects in all clusters from a single interface. The management console search page supports searching for application resources by the component kind for each resource.
1.Back to the IBM Cloud Pak for Multicloud Management web page tab, click on the Search button.

2.The Search menu gives access to application resources and Kubernetes objects. The Search overview screen displays commonly used search templates - a pre-defined template to view workloads, unhealthy pods and workloads created in last hour. You can also create your own search templates. Click on Created Last Hour button.
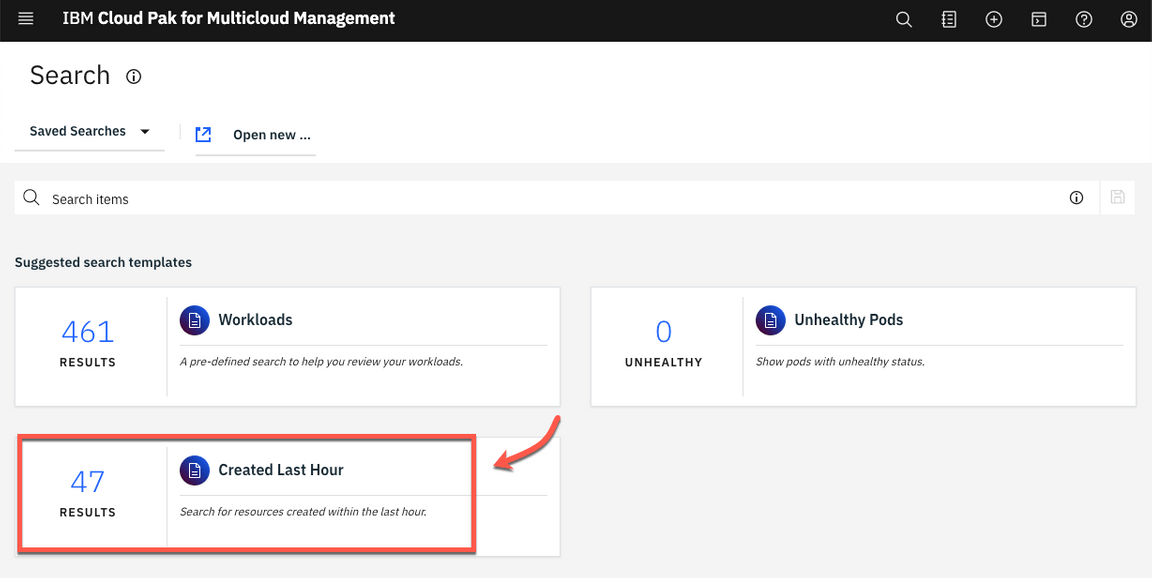
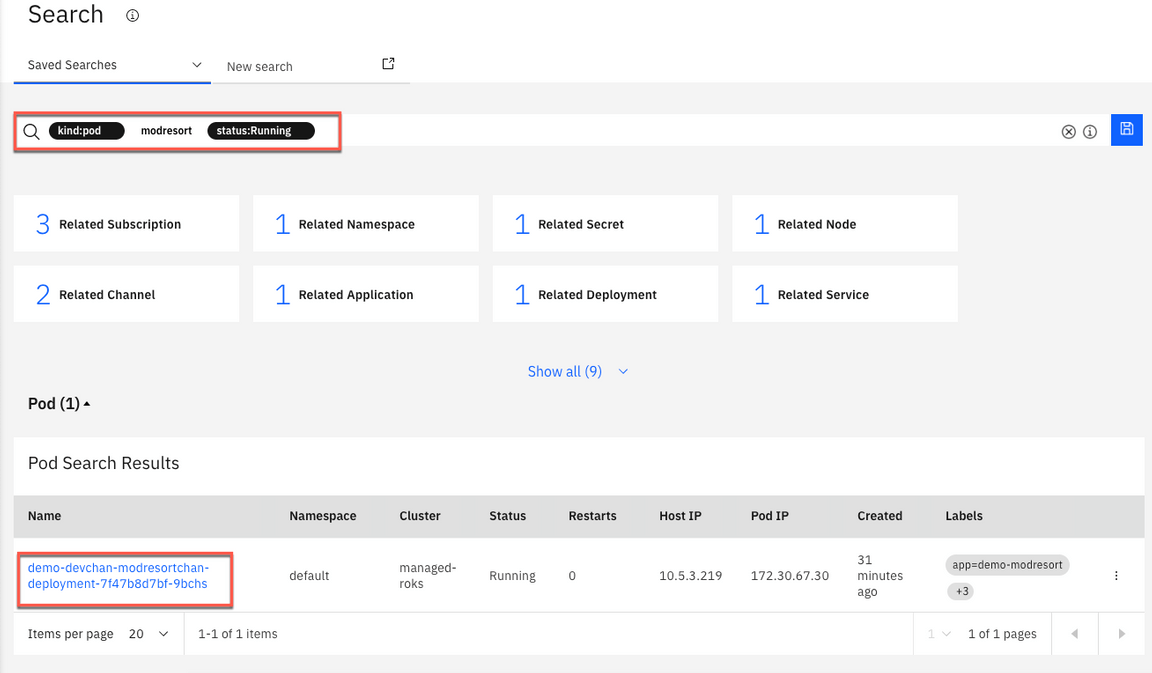
3.If you scroll down to the Pod section, you should see the demo-modresort pod that you created earlier in the list along with other pods. You can also provide the search criteria in the filter section. For example: type kind and select pod, provide the modresort as search string and specify status as Running.
Congratulations! You have successfully completed the lab “Multicluster Management with IBM Cloud Pak for Multicloud Management”.
Summary
You completed the Cloud Pak for Multicloud Management tutorial: Multi-cluster Management. Throughout the tutorial, you explored the key takeaways:
Understand Cloud Pak for Multicloud Management;Add a managed cluster;Deploy an application chart;Manage and monitor application resources of local and remote clusters;
If you would like to learn more about Cloud Pak for Multicloud Management, please refer to:
